Benchmark Harness: CBTOOL and Benchmark Drivers Setup and Preparation
Introduction to CBTOOL
Cloud Rapid Experimentation and Analysis Tool (CBTOOL), also known as “CloudBench” (CB), is a framework that automates cloud-scale evaluation and benchmarking through running of controlled experiments, where complete application workloads are automatically deployed.
Experiments are described through experiment plans, containing directives with enough descriptive power to make the experiment descriptions brief while allowing for customizable multi-parameter variation. While usually specified as a text file that is read by the main CBTOOL executable at the beginning of a run, these directives can also be directly typed in the framework’s CLI, or submitted as series of XML-RPC API calls. Experiments can be executed in multiple clouds using a single interface. CBTOOL is capable of managing experiments spread across multiple regions and for long periods of time.
At the core of each experiment, there is the notion of application workloads. Termed “Virtual Application” (VApp) or “Application Instance” (AI), each workload is implemented by a group of cloud instances, with different roles, logically interconnected in order to execute different applications (typically, but not limited to, benchmarks). For instance, a Cassandra YCSB AI is composed by one instance with the role “ycsb”, and one (or more) instance(s) with the role “seed” (i.e., Cassandra seed nodes). On other hand a Hadoop AI is composed by one instance with the role “hadoopmaster” and N VMs with the role “hadoopslave”.
To see a list of available instance roles, use the command “rolelist” on the CLI. To see a list of AI types use the command “typelist”. To see a description of a particular AI, use the command “typeshow (vapp type)”.
Each AI has its own load behavior, with independent load profile, load level and load duration. The values for load level and load duration can be set as random distributions (exponential, uniform, gamma, normal), fixed numbers or monotonically increasing/decreasing sequences. The load level, has a meaning that is specific to each AI type. For instance, for a Cassandra YCSB AI, it represents the number of simultaneous threads on the YCSB load generator, while for Hadoop it represents the size of dataset to be sorted.
During an experiment, relevant metrics are automatically collected such as provisioning latency and throughput, and application runtime performance. Instance CPU, disk, memory, and network performance data can also be collected, although such collection is disabled for a compliant run.
Lastly, the experiment is terminated after the conditions specified in the experiment plan are met (e.g., a certain amount of time has passed, or a number of parameter variations have happened). CBTOOL’s workflow through its main components is represented in the following diagram.

AI can be deployed explicitly by the experimenter (using either the CLI or GUI) or implicitly through one (or more) AI Submitter(s). An AI Submitter deploys Application Instances with a given pattern, represented by a certain inter-arrival time and a lifetime (also fixed, distributions or sequences).
To see a list of available patterns, use the command “patternlist” on the CLI. To see a description of a particular pattern, use the command “patternshow (vapp submitter pattern)”.
The tool was written in Python (about 20K lines of code), and has only open-source dependencies. The main ones are Redis, MongoDB and Ganglia.
CBTOOL has a layered architecture, designed to be expandable and re-usable. All interactions with external elements (cloud environments and applications) are performed through pluggable components. The ability to interact with different cloud environments is added through new cloud adapters, while the ability to automate the deployment and collect performance specific data from new applications (i.e., AI types) is added through workload automation scripts. These pluggable components are self-contained, and don’t require changes in the source code. This characteristic enables cloud environment and application experts to develop expand CBTOOL’s scope directly and incrementally.
To set up CBTOOL, please follow the instructions below.
Preparing a QCOW2 Benchmark Harness Image for Ubuntu (CBTOOL and Benchmark Drivers)
The instructions below assume that the tester will install CBTOOL in an instance (e.g., a VM) which will have access to the Internet at the time of kit installation.
If Internet access is not available, then the tester must set up the Ubuntu and python pip repositories locally and configure the instance with these repositories. The instructions to configure these repositories are not in the scope of this document.
The benchmark has been tested and is known to work with an Ubuntu 14.04 x86_64 image. If you already have such an image available you can use it, otherwise one can be found in Step 1 below.
Download the Ubuntu 14.04 x86_64 image from Ubuntu site:
wget https://cloud-images.ubuntu.com/trusty/current/trusty-server-cloudimg-amd64-disk1.img
Upload the above image in your OpenStack cloud.
Assuming openrc for your OpenStack cloud is present at /root:
source /root/openrc
glance image-create --name trusty --disk-format qcow2 --container-format bare --is-public True --file ./trusty-server-cloudimg-amd64-disk1.img
(The image does not have to be made public)
The instructions for OpenStack-based public clouds may slightly differ.
- Create a VM from this blank Ubuntu image.
- Choose at least m1.medium flavor (2 VCPU, 4GB RAM, 40 GB root disk).
- Boot from ‘trusty’ image that was uploaded earlier.
- Select a key to inject.
- Select the network to install (make sure that the network has Internet connectivity).
- Press Launch.
SSH into your VM, get the latest package list, and install unzip and git packages. Make sure that DNS is configured correctly in this VM (/etc/hosts file):
ssh -i YOURKEY ubuntu@[YOURVMIPADDR]
sudo apt-get update
sudo apt-get install git -y
sudo apt-get install unzip -y
Add your machine hostname and IP address to /etc/hosts file. If more than one interface is configured in the system as indicated by the output of ifconfig -a, add the IP address and hostname to /etc/hosts which will be accessible from a browser.:
vi /etc/hosts
IPADDR HOSTNAME
Copy the kit zip file in this VM and unzip the kit file in home directory:
unzip spec_cloud_iaas_2016_*.zip
It will create the following files:
$ ls ~/
osgcloud                                      SPEC_CLOUD_README  workloads
spec_cloud_iaas_2016_*.zip  SPEC_LICENSE
Development only: Checkout the latest benchmark harness code. Assuming, the benchmark harness was downloaded into /home/ubuntu/osgcloud:
cd /home/ubuntu/osgcloud/
git pull

cd /home/ubuntu/osgcloud/cbtool
git pull origin master
- Prepare the keys to be used with CBTOOL and instances
Generate your own ssh key:
ssh-keygen [press ENTER for all options]The above command will create the following directory if it does not exist and add id_rsa and id_rsa.pub keys into it. Add this key to the authorized_keys file:
/home/ubuntu/.ssh/
  cat /home/ubuntu/.ssh/id_rsa.pub >> /home/ubuntu/.ssh/authorized_keys
If you are using ssh keys shipped with the kit, please use the following commands to copy the keys into /home/ubuntu/.ssh directory. Please do not use these keys for public clouds:
cp /home/ubuntu/osgcloud/spec_ssh_keys/spec_ssh /home/ubuntu/.ssh/id_rsa
cp /home/ubuntu/osgcloud/spec_ssh_keys/spec_ssh.pub /home/ubuntu/.ssh/id_rsa.pub
cat /home/ubuntu/osgcloud/spec_ssh_keys/spec_ssh.pub >> /home/ubuntu/.ssh/authorized_keys
Copy the keys into CBTOOL credentials directory:
cp /home/ubuntu/.ssh/id_rsa /home/ubuntu/osgcloud/cbtool/credentials/cbtool_rsa
cp /home/ubuntu/.ssh/id_rsa.pub /home/ubuntu/osgcloud/cbtool/credentials/cbtool_rsa.pub
Ensure that the permissions of these keys is restrictive:
chmod 400 /home/ubuntu/osgcloud/cbtool/credentials/cbtool_rsa
chmod 400 /home/ubuntu/osgcloud/cbtool/credentials/cbtool_rsa.pub
Now, we are ready to install CBTOOL:
cd /home/ubuntu/osgcloud/
./cbtool/install -r orchestrator
Here is the output:
ubuntu@cbtool-spec:~/osgcloud/cbtool$ ./install -r orchestrator
Installing dependencies for Cloud Rapid Experimentation Analysis and Toolkit (cbtool) on this node.........
File "/home/ubuntu/osgcloud/cbtool//configs/templates//PUBLIC_dependencies.txt" opened and loaded....
File "/home/ubuntu/osgcloud/cbtool//configs/templates//IBM_dependencies.txt" IGNORED....
File "/home/ubuntu/osgcloud/cbtool//configs/templates//SPEC_dependencies.txt" IGNORED....
No package repository specified. Will ignore any repository URL that has the keyword REPO_ADDR...
No python pip repository specified.
#####This node will be prepared as an Orchestration Node. The full set of dependencies will be installed. #####
(0) Checking passwordless sudo for the user "ubuntu" by executing the command "sudo -S ls < /dev/null"...
RESULT: ANY >= ANY OK.

(1) Checking "repo" version by executing the command "ls -la /tmp/repoupdated"...
RESULT: NOT OK.
ACTION:  Please install/configure "repo" by issuing the following command: "sudo mv -f /tmp/*.list /etc/apt/sources.list.d/; sudo apt-get update; touch /tmp/repoupdated; source /home/ubuntu/osgcloud/cbtool/scripts//common/cb_bootstrap.sh; service_stop_disable iptables; service_stop_disable ipfw;"

(1) Installing "repo" by executing the command "sudo mv -f /tmp/*.list /etc/apt/sources.list.d/; sudo apt-get update; touch /tmp/repoupdated; source /home/ubuntu/osgcloud/cbtool/scripts//common/cb_bootstrap.sh; service_stop_disable iptables; service_stop_disable ipfw;"...
RESULT: NOT OK. There was an error while installing "repo".: Error while executing the command line "sudo mv -f /tmp/*.list /etc/apt/sources.list.d/; sudo apt-get update; touch /tmp/repoupdated; source /home/ubuntu/osgcloud/cbtool/scripts//common/cb_bootstrap.sh; service_stop_disable iptables; service_stop_disable ipfw;" (returncode = 2747) :sudo: unable to resolve host cbtool-spec
mv: cannot stat ‘/tmp/*.list’: No such file or directory
sudo: unable to resolve host cbtool-spec
/bin/sh: 1: source: not found
/bin/sh: 1: service_stop_disable: not found
/bin/sh: 1: service_stop_disable: not found


(2) Checking "ifconfig" version by executing the command "ifconfig"...
RESULT: ANY >= ANY OK.

(3) Checking "ip" version by executing the command "ip -V"...
RESULT: ANY >= ANY OK.

(4) Checking "git" version by executing the command "git --version | cut -d ' ' -f 3"...
RESULT: 1.9.1 >= 1.6.0 OK.

(5) Checking "wget" version by executing the command "wget -V | head -n 1 | cut -d ' ' -f 3"...
RESULT: 1.15 >= 1.00 OK.

(6) Checking "pip" version by executing the command "pip --version | cut -d ' ' -f 2"...
RESULT:  NOT OK.
ACTION:  Please install/configure "pip" by issuing the following command: "sudo apt-get -y install python-pip;"

(6) Installing "pip" by executing the command "sudo apt-get -y install python-pip;"...

RESULT: DONE OK.

(7) Checking "gcc" version by executing the command "gcc -v 2>&1 | grep -v Configured | grep version | cut -d ' ' -f 3"...
RESULT: 4.8.2 >= 4.0 OK.

(8) Checking "make" version by executing the command "make -v | head -n1 | cut -d ' ' -f 3"...
RESULT: 3.81 >= 3.5 OK.

(10) Checking "sshpass" version by executing the command "sshpass -V | grep sshpass | head -n 1 | cut -d ' ' -f 2"...
RESULT:  NOT OK.
ACTION:  Please install/configure "sshpass" by issuing the following command: "sudo apt-get -y install sshpass;"

(10) Installing "sshpass" by executing the command "sudo apt-get -y install sshpass;"...
RESULT: DONE OK.

(11) Checking "curl" version by executing the command "curl -V | head -n 1 | cut -d ' ' -f 2"...
RESULT: 7.35.0 >= 7.0 OK.

(12) Checking "screen" version by executing the command "screen -v | grep version"...
RESULT: 4.01.00206 >= 4.0 OK.

(13) Checking "rsync" version by executing the command "rsync --version | grep version"...
RESULT: 3.1.031 >= 2.6 OK.

(14) Checking "ncftp" version by executing the command "ncftp -h 2>&1 | grep Program | cut -d ' ' -f 5 | sed -e 's/\//./g'"...
RESULT:  NOT OK.
ACTION:  Please install/configure "ncftp" by issuing the following command: "sudo apt-get -y install ncftp;"

(14) Installing "ncftp" by executing the command "sudo apt-get -y install ncftp;"...
RESULT: DONE OK.

(15) Checking "lftp" version by executing the command "lftp --version | grep Version | cut -d " " -f 4"...
RESULT:  NOT OK.
ACTION:  Please install/configure "lftp" by issuing the following command: "sudo apt-get -y install lftp;"

(15) Installing "lftp" by executing the command "sudo apt-get -y install lftp;"...
RESULT: DONE OK.

(16) Checking "netcat" version by executing the command "netcat -v -w 1 localhost -z 22"...
RESULT: ANY >= ANY OK.

(17) Checking "nmap" version by executing the command "nmap -V | grep version | cut -d ' ' -f 3"...
RESULT:  NOT OK.
ACTION:  Please install/configure "nmap" by issuing the following command: "sudo apt-get -y install nmap;"

(17) Installing "nmap" by executing the command "sudo apt-get -y install nmap;"...
RESULT: DONE OK.

(18) Checking "openvpn" version by executing the command "openvpn --version | grep built | cut -d ' ' -f 2"...
RESULT:  NOT OK.
ACTION:  Please install/configure "openvpn" by issuing the following command: "sudo apt-get -y install openvpn;sudo ln -s /usr/sbin/openvpn /usr/local/bin/openvpn"

(18) Installing "openvpn" by executing the command "sudo apt-get -y install openvpn;sudo ln -s /usr/sbin/openvpn /usr/local/bin/openvpn"...
RESULT: DONE OK.

(19) Checking "gmond" version by executing the command "gmond --version | cut -d ' ' -f 2"...
RESULT:  NOT OK.
ACTION:  Please install/configure "gmond" by issuing the following command: "sudo apt-get -y install ganglia-monitor;sudo ln -s /usr/sbin/gmond /usr/local/bin/gmond; sudo bash -c "echo 'manual' > /etc/init/ganglia-monitor.override""

(19) Installing "gmond" by executing the command "sudo apt-get -y install ganglia-monitor;sudo ln -s /usr/sbin/gmond /usr/local/bin/gmond; sudo bash -c "echo 'manual' > /etc/init/ganglia-monitor.override""...
RESULT: DONE OK.

(20) Checking "chef-client" version by executing the command "knife -v | cut -d ' ' -f 2"...
There are 1 dependencies missing: None of the urls indicated to install "chef-client" (https://opscode-omnibus-packages.s3.amazonaws.com/ubuntu/12.04/x86_64/chef_11.10.4-1.ubuntu.12.04_amd64.deb,) seem to be functional.
Please add the missing dependency(ies) and re-run install again.
Keep rerunning the install command until there are no issues. Here is what a successful output looks like:
./install -r orchestrator

    ubuntu@cbtool-spec:~/osgcloud/cbtool$ sudo ./install -r orchestrator
    sudo: unable to resolve host cbtool-spec
    Installing dependencies for Cloud Rapid Experimentation Analysis and Toolkit (cbtool) on this node.........
    File "/home/ubuntu/osgcloud/cbtool//configs/templates//PUBLIC_dependencies.txt" opened and loaded....
    File "/home/ubuntu/osgcloud/cbtool//configs/templates//IBM_dependencies.txt" IGNORED....
    File "/home/ubuntu/osgcloud/cbtool//configs/templates//SPEC_dependencies.txt" IGNORED....
    No package repository specified. Will ignore any repository URL that has the keyword REPO_ADDR...
    No python pip repository specified.
    #####This node will be prepared as an Orchestration Node. The full set of dependencies will be installed. #####
    (0) Checking passwordless sudo for the user "root" by executing the command "sudo -S ls < /dev/null"...
    RESULT: ANY >= ANY OK.

    (1) Checking "repo" version by executing the command "ls -la /tmp/repoupdated"...
    RESULT: ANY >= ANY OK.

    (2) Checking "ifconfig" version by executing the command "ifconfig"...
    RESULT: ANY >= ANY OK.

    (3) Checking "ip" version by executing the command "ip -V"...
    RESULT: ANY >= ANY OK.

    (4) Checking "git" version by executing the command "git --version | cut -d ' ' -f 3"...
    RESULT: 1.9.1 >= 1.6.0 OK.

    (5) Checking "wget" version by executing the command "wget -V | head -n 1 | cut -d ' ' -f 3"...
    RESULT: 1.15 >= 1.00 OK.

    (6) Checking "pip" version by executing the command "pip --version | cut -d ' ' -f 2"...
    RESULT: 1.5.4 >= 1.0 OK.

    (7) Checking "gcc" version by executing the command "gcc -v 2>&1 | grep -v Configured | grep version | cut -d ' ' -f 3"...
    RESULT: 4.8.2 >= 4.0 OK.

    (8) Checking "make" version by executing the command "make -v | head -n1 | cut -d ' ' -f 3"...
    RESULT: 3.81 >= 3.5 OK.

    (10) Checking "sshpass" version by executing the command "sshpass -V | grep sshpass | head -n 1 | cut -d ' ' -f 2"...
    RESULT: 1.05 >= 1.0 OK.

    (11) Checking "curl" version by executing the command "curl -V | head -n 1 | cut -d ' ' -f 2"...
    RESULT: 7.35.0 >= 7.0 OK.

    (12) Checking "screen" version by executing the command "screen -v | grep version"...
    RESULT: 4.01.00206 >= 4.0 OK.

    (13) Checking "rsync" version by executing the command "rsync --version | grep version"...
    RESULT: 3.1.031 >= 2.6 OK.

    (14) Checking "ncftp" version by executing the command "ncftp -h 2>&1 | grep Program | cut -d ' ' -f 5 | sed -e 's/\//./g'"...
    RESULT: 3.2.5.474 >= 3.2.3 OK.

    (15) Checking "lftp" version by executing the command "lftp --version | grep Version | cut -d " " -f 4"...
    RESULT: 4.4.13 >= 4.0 OK.

    (16) Checking "netcat" version by executing the command "netcat -v -w 1 localhost -z 22"...
    RESULT: ANY >= ANY OK.

    (17) Checking "nmap" version by executing the command "nmap -V | grep version | cut -d ' ' -f 3"...
    RESULT: 6.40 >= 4.0 OK.

    (18) Checking "openvpn" version by executing the command "openvpn --version | grep built | cut -d ' ' -f 2"...
    RESULT: 2.3.2 >= 2.2.0 OK.

    (19) Checking "gmond" version by executing the command "gmond --version | cut -d ' ' -f 2"...
    RESULT: 3.6.0 >= 3.0 OK.

    (20) Checking "chef-client" version by executing the command "knife -v | cut -d ' ' -f 2"...
    RESULT: 11.10.4 >= 11.4.0 OK.

    (21) Checking "rsyslog" version by executing the command "rsyslogd -v | grep compiled | cut -d ' ' -f 2 | sed 's/,//g'"...
    RESULT: 7.4.4 >= 4.6.0 OK.

    (23) Checking "apache" version by executing the command "sudo apachectl -v | grep version | cut -d '/' -f 2 | cut -d ' ' -f 1"...
    RESULT: 2.4.7 >= 2.0 OK.

    (24) Checking "redis" version by executing the command "redis-server -v | sed 's/[^0-9]*//g'"...
    RESULT: 284000000000341644405760659 >= 2.6.0 OK.

    (25) Checking "mongodb" version by executing the command " mongod --version"...
    RESULT: 2.4.93190011.82652021959325620573864029 >= 2.4.0 OK.

    (27) Checking "python-devel" version by executing the command "python -c "from distutils import sysconfig as s; print s.get_config_vars()['INCLUDEPY']""...
    RESULT: ANY >= ANY OK.

    (28) Checking "python-setuptools" version by executing the command "python -c "import setuptools; from setuptools import sandbox""...
    RESULT: ANY >= ANY OK.

    (29) Checking "python-prettytable" version by executing the command "python -c "import prettytable; print str(prettytable.__version__).strip()""...
    RESULT: 0.7.2 >= 0.6 OK.

    (30) Checking "python-daemon" version by executing the command "python -c "import daemon; print str(daemon._version).strip()""...
    RESULT: 1.5.5 >= 1.5.1 OK.

    (31) Checking "python-twisted" version by executing the command "python -c "import twisted; from twisted.web.wsgi import WSGIResource; from twisted.internet import reactor; from twisted.web.static import File; from twisted.web.resource import Resource; from twisted.web.server import Site; from twisted.web import wsgi; print str(twisted.__version__).strip()""...
    RESULT: 13.2.0 >= 8.0.0 OK.

    (32) Checking "python-webob" version by executing the command "python -c "import webob; from webob import Request, Response, exc""...
    RESULT: ANY >= ANY OK.

    (33) Checking "python-beaker" version by executing the command "python -c "import beaker; from beaker.middleware import SessionMiddleware""...
    RESULT: ANY >= ANY OK.

    (34) Checking "pyredis" version by executing the command "python -c "import redis; print str(redis.VERSION).replace('(','').replace(')','').replace(', ','.').strip()""...
    RESULT: 2.10.3 >= 2.6.0 OK.

    (35) Checking "pymongo" version by executing the command "python -c "import pymongo; print str(pymongo.version).strip().replace('+','')""...
    RESULT: 2.8 >= 2.5 OK.

    (36) Checking "pylibvirt" version by executing the command "python -c "import libvirt; print str(libvirt.getVersion()).strip()""...
    RESULT: 1002002 >= 9003 OK.

    (37) Checking "pypureomapi" version by executing the command "python -c "import pypureomapi; print str(pypureomapi.__version__).strip()""...
    RESULT: 0.3 >= 0.3 OK.

    (38) Checking "pyhtml" version by executing the command "python -c "import HTML; print str(HTML.__version__).strip()""...
    RESULT: 0.04 >= 0.04 OK.

    (39) Checking "gmetad-python" version by executing the command "ls -la /home/ubuntu/osgcloud/cbtool/3rd_party/monitor-core/gmetad-python/gmetad.py"...
    RESULT: ANY >= ANY OK.

    (40) Checking "bootstrap" version by executing the command "ls -la /home/ubuntu/osgcloud/cbtool/3rd_party/bootstrap/package.json"...
    RESULT: ANY >= ANY OK.

    (41) Checking "bootstrap-wizard" version by executing the command "ls -la /home/ubuntu/osgcloud/cbtool/3rd_party/Bootstrap-Wizard/README.md"...
    RESULT: ANY >= ANY OK.

    (42) Checking "streamprox" version by executing the command "ls -la /home/ubuntu/osgcloud/cbtool/3rd_party/StreamProx/README.md"...
    RESULT: ANY >= ANY OK.

    (43) Checking "d3" version by executing the command "ls -la /home/ubuntu/osgcloud/cbtool/3rd_party/d3/component.json"...
    RESULT: ANY >= ANY OK.

    (44) Checking "novaclient" version by executing the command "python -c "import novaclient; from novaclient.v1_1 import client""...
    RESULT: ANY >= ANY OK.

    (45) Checking "softlayer" version by executing the command "python -c "import SoftLayer; print "SoftLayer.__version__".replace('v','')""...
    RESULT: 3.3.1 >= 3.1 OK.

    (47) Checking "boto" version by executing the command "python -c "import boto; print str(boto.__version__).strip().replace('-dev','')""...
    RESULT: 2.36.0 >= 2.1.8 OK.

    (48) Checking "libcloud" version by executing the command "python -c "import libcloud; print str(libcloud.__version__).replace('-dev','').strip()""...
    RESULT: 0.16.0 >= 0.11.0 OK.

    (50) Checking "R" version by executing the command "R --version | grep version | grep -v GNU"...
    RESULT: 3.0.220130925 >= 2.1 OK.

    (49) Checking "iptables" version by executing the command "iptables -v 2>&1 | grep v | cut -d ' ' -f 2 | sed 's/v//g' | sed 's/://g'"...
    RESULT: 1.4.21 >= 1.2 OK.

    (51) Checking "sshkey" version by executing the command "ls /home/ubuntu/osgcloud/cbtool/credentials//cbtool_rsa"...
    RESULT: ANY >= ANY OK.

    (52) Checking "sshd" version by executing the command "sudo cat /etc/ssh/sshd_config | grep -v ^# | grep UseDNS | grep no"...
    RESULT: NOT OK.
    ACTION:  Please install/configure "sshd" by issuing the following command: "sed -i 's/.*UseDNS.*/UseDNS no/g' /etc/ssh/sshd_config; sed -i 's/.*GSSAPIAuthentication.*/GSSAPIAuthentication no/g' /etc/ssh/sshd_config;"

    (52) Installing "sshd" by executing the command "sed -i 's/.*UseDNS.*/UseDNS no/g' /etc/ssh/sshd_config; sed -i 's/.*GSSAPIAuthentication.*/GSSAPIAuthentication no/g' /etc/ssh/sshd_config;"...
    RESULT: DONE OK.

    All dependencies are in place
    Checking for a "private" configuration file for user "root" in /home/ubuntu/osgcloud/cbtool//configs/root_cloud_definitions.txt)
    Copying /home/ubuntu/osgcloud/cbtool//configs/cloud_definitions.txt to /home/ubuntu/osgcloud/cbtool//configs/root_cloud_definitions.txt...
    Please re-run configure again
Check if your redis server is running by executing the following command:
sudo netstat -tulpn | grep 6379
tcp        0      0 127.0.0.1:6379          0.0.0.0:*               LISTEN      11701/redis-server
If redis is listening on 127.0.0.1, please do the following:
sudo service redis-server restart
Then, lets start CBTOOL:
cd /home/ubuntu/osgcloud/cbtool
./cb --soft_reset
You should see an output like this:
ubuntu@cbtool-spec:~/osgcloud/cbtool$ ./cb --soft_reset
Cbtool version is "7b33da7"
Parsing "cloud definitions" file..... "/home/ubuntu/osgcloud/cbtool/lib/auxiliary//../..//configs/cloud_definitions.txt" opened and parsed successfully.
Checking "Object Store".....An Object Store of the kind "Redis" (shared) on node 9.47.240.196, TCP port 6379, database id "0" seems to be running.
Checking "Log Store".....A Log Store of the kind "rsyslog" (private) on node 9.47.240.196, UDP port 5114 seems to be running.
Checking "Metric Store".....A Metric Store of the kind "MongoDB" (shared) on node 9.47.240.196, TCP port 27017, database id "metrics" seems to be running.
Executing "hard" reset: (killing all running toolkit processes and flushing stores) before starting the experiment......
Killing all processes... done
Flushing Object Store... done
Flushing Metric Store... done
Flushing Log Store... done
Checking for a running API service daemon.....API Service daemon was successfully started. The process id is 21498 (http://9.47.240.196:7070).
Checking for a running GUI service daemon.....GUI Service daemon was successfully started. The process id is 21522, listening on port 8080. Full url is "http://9.47.240.196:8080".
The "sim" cloud named "MYSIMCLOUD" was successfully attached to this experiment.
The experiment identifier is EXP-02-03-2015-07-08-02-PM-UTC

 status: VMC 1D4C79C0-E126-5680-B375-0C6DC0BD60B1 was successfully registered on SimCloud "MYSIMCLOUD".
 status: VMC EAEBC719-8DD7-523D-948C-644640C2C9F0 was successfully registered on SimCloud "MYSIMCLOUD".
 status: VMC FBEB4F2B-AAF9-58FA-A23A-D68FC8F161E7 was successfully registered on SimCloud "MYSIMCLOUD".
 status: VMC A75CBDB2-5541-5478-8227-B74BA9ABC862 was successfully registered on SimCloud "MYSIMCLOUD".
 status: Attribute "collect_from_host" was set to "false". Skipping Host OS performance monitor daemon startup
All VMCs successfully attached to this experiment.
(MYSIMCLOUD)
Follow the instructions on Running Benchmark with a Simulated Cloud page to run a ‘simulated mode’ of the benchmark. The details of the ‘simulated mode’ are also described in that page.
Check the version of the mongo installed. The SPEC Cloud IaaS 2016 Benchmark kit does not ship with the mongo server. It is installed as part of CBTOOL installation. The following mongo version have been tested with CBTOOL shipped in the kit:
$mongo --version
MongoDB shell version: 2.4.9
Check the redis version installed. CBTOOL shipped with the benchmark has been tested with the following redis version:
$redis-server -v
Redis server v=2.8.4
If during subsequent installation of the benchmark, a new redis version is found not to work, the tester should install redis with the above version.
- Check python package versions. The following commands are helpful. These commands assume connectivity to Ubuntu and Python respositories.
Install Python package manager, namely, pip:
sudo apt-get install python-pipList python packages:
sudo pip listInstall a python package:
sudo pip install PYTHONPACKAGE(replace PYTHONPACKAGE with the name of package being installed)
Install a python package with a version:
sudo pip install PYTHONPACKAGE==0.1Remove a python package:
sudo pip uninstall PYTHONPACKAGE
The pip packages installed on the benchmark harness machine and their version should resemble this list:
      sudo pip list

      apache-libcloud (0.17.0)
      apt-xapian-index (0.45)
      Babel (1.3)
      backports.ssl-match-hostname (3.4.0.2)
      Beaker (1.6.3)
      boto (2.38.0)
      chardet (2.0.1)
      click (4.0)
      cliff (1.12.0)
      cmd2 (0.6.8)
      colorama (0.2.5)
      docutils (0.12)
      HTML.py (0.4)
      html5lib (0.999)
      iso8601 (0.1.10)
      libvirt-python (1.2.2)
      lockfile (0.8)
      msgpack-python (0.4.6)
      netaddr (0.7.14)
      netifaces (0.10.4)
      oslo.config (1.11.0)
      oslo.i18n (1.6.0)
      oslo.serialization (1.5.0)
      oslo.utils (1.5.0)
      PAM (0.4.2)
      pbr (0.11.0)
      pip (7.1.2)
      prettytable (0.7.2)
      pssh (2.2.2)
      pycrypto (2.6.1)
      pymongo (2.7.2)
      pyOpenSSL (0.13)
      pyparsing (2.0.3)
      pypureomapi (0.3)
      pyserial (2.6)
      python-apt (0.9.3.5ubuntu1)
      python-daemon (1.5.5)
      python-debian (0.1.21-nmu2ubuntu2)
      python-keystoneclient (1.4.0)
      python-neutronclient (2.5.0)
      python-novaclient (2.25.0)
      pytz (2015.4)
      PyYAML (3.11)
      redis (2.10.3)
      requests (2.7.0)
      ruamel.base (1.0.0)
      ruamel.ordereddict (0.4.9)
      ruamel.yaml (0.10.7)
      setuptools (3.3)
      simplejson (3.6.5)
      six (1.9.0)
      SoftLayer (4.0.2)
      ssh-import-id (3.21)
      stevedore (1.4.0)
      Twisted-Core (13.2.0)
      Twisted-Web (13.2.0)
      urllib3 (1.7.1)
      WebOb (1.3.1)
      wheel (0.24.0)
      zope.interface (4.0.5)


If there is an issue installing pyOpenSSL package, please make sure that you
have installed libssl-dev package::

      sudo apt-get install libssl-dev
Preparing a QCOW2 Benchmark Harness Image for Centos (CBTOOL and Benchmark Drivers)
The instructions below assume that the tester will install CBTOOL in an instance (e.g., VM) which will have access to the Internet at the time of kit installation.
If Internet access is not available, then the tester must set up the Centos and python pip repositories locally and configure the instance with these repositories. The instructions to configure these repositories are not in the scope of this document.
The benchmark has been tested and is known to work with an CentOS Linux 7.1 x86_64 image. If you already have such an image available you can use it, otherwise one can be found in Step 1 below.
Download the Centos 7.1 x86_64 image from Centos site:
raw: wget http://cloud.centos.org/centos/7/images/CentOS-7-x86_64-GenericCloud.raw
qcow2: wget http://cloud.centos.org/centos/7/images/CentOS-7-x86_64-GenericCloud.raw
Upload the above image in your OpenStack cloud.
Assuming openrc for your OpenStack cloud is present at /root:
source /root/openrc
glance image-create --name Centos7.1-x86_64 --disk-format raw --container-format bare --is-public True --file ./CentOS-7-x86_64-GenericCloud.raw
or
glance image-create --name Centos7.1-x86_64 --disk-format qcow2 --container-format bare --is-public True --file ./CentOS-7-x86_64-GenericCloud.raw
(The image does not have to be made public)
The instructions for OpenStack-based public clouds may slightly differ.
- Create a VM from this blank Centos image.
- Choose at least m1.medium flavor (2 VCPU, 4GB RAM, 40 GB root disk).
- Boot from image Centos7.1-x86_64 image that was uploaded earlier.
- Select a key to inject.
- Select the network to install (make sure that the network has Internet connectivity).
- Press Launch.
ssh into your VM, get the latest package list, and install unzip and git packages. Make sure that DNS is configured correctly in this VM (/etc/hosts file):
ssh -i YOURKEY centos@[YOURVMIPADDR]
sudo yum update -y
sudo yum install git -y
sudo yum install unzip -y
Add your machine hostname and IP address to /etc/hosts file. If more than one interface is configured in the system as indicated by the output of ifconfig -a, add the IP address and hostname to /etc/hosts which will be accessible from a browser.:
vi /etc/hosts
IPADDR HOSTNAME
Copy the kit zip file in this VM and unzip the kit file in home directory:
unzip spec_cloud_iaas_2016_*.zip
It will create the following files:
$ ls ~/
osgcloud                                      SPEC_CLOUD_README  workloads
spec_cloud_iaas_2016_*.zip  SPEC_LICENSE
where * is replaced with actual timestamp.
Development only: Checkout the latest benchmark harness code. Assuming, the benchmark harness was downloaded into /home/centos/osgcloud:
cd /home/centos/osgcloud/
git pull

cd /home/centos/osgcloud/cbtool
git pull origin master
- Prepare the keys to be used with CBTOOL and instances
Generate your own ssh key:
ssh-keygen [press ENTER for all options]The above command will create the following directory if it does not exist and add id_rsa and id_rsa.pub keys into it. Add this key to authorized_keys file:
/home/centos/.ssh/
  cat /home/centos/.ssh/id_rsa.pub >> /home/centos/.ssh/authorized_keys
If you are using ssh keys shipped with the kit, please use the following commands to copy the keys into /home/centos/.ssh directory. Please do not use these keys for public clouds:
cp /home/centos/osgcloud/spec_ssh_keys/spec_ssh /home/centos/.ssh/id_rsa
cp /home/centos/osgcloud/spec_ssh_keys/spec_ssh.pub /home/centos/.ssh/id_rsa.pub
cat /home/centos/osgcloud/spec_ssh_keys/spec_ssh.pub >> /home/centos/.ssh/authorized_keys
Copy the keys into CBTOOL credentials directory:
cp /home/centos/.ssh/id_rsa /home/centos/osgcloud/cbtool/credentials/cbtool_rsa
cp /home/centos/.ssh/id_rsa.pub /home/centos/osgcloud/cbtool/credentials/cbtool_rsa.pub
Ensure that the permissions of these keys is restrictive:
chmod 400 /home/centos/osgcloud/cbtool/credentials/cbtool_rsa
chmod 400 /home/centos/osgcloud/cbtool/credentials/cbtool_rsa.pub
Disable selinux Open the file /etc/sysconfig/selinux and modify the line to the following SELINUX=disabled
Upgrade pip before we run the CBTOOL:
[centos@centos-cbtool osgcloud]$ sudo pip install --upgrade pip
You are using pip version 7.1.0, however version 8.0.2 is available.
You should consider upgrading via the 'pip install --upgrade pip' command.
Collecting pip
   Downloading pip-8.0.2-py2.py3-none-any.whl (1.2MB)
       100% |████████████████████████████████| 1.2MB 432kB/s
       Installing collected packages: pip
         Found existing installation: pip 7.1.0
       Uninstalling pip-7.1.0:
             Successfully uninstalled pip-7.1.0
             Successfully installed pip-8.0.2
Install the following dependencies:
sudo yum install libffi-devel -y
sudo yum install openssl-devel -y
Cleanup /home/centos/google-cloud-sdk/ to avoid duplicate directory errors:
rm -fr /home/centos/google-cloud-sdk/
Now, we are ready to install CBTOOL:
cd /home/centos/osgcloud/
  ./cbtool/install -r orchestrator
Here is the output:
[centos@centos-cbtool osgcloud]$ ./cbtool/install -r orchestrator
Installing dependencies for Cloud Rapid Experimentation Analysis and Toolkit (cbtool) on this node.........

##### INFO: File "/home/centos/osgcloud/cbtool//configs/templates//PUBLIC_dependencies.txt" opened and loaded....
##### WARNING: File "/home/centos/osgcloud/cbtool//configs/templates//IBM_dependencies.txt" IGNORED....
##### WARNING: File "/home/centos/osgcloud/cbtool//configs/templates//SPEC_dependencies.txt" IGNORED....
##### WARNING: No package repository specified. Will ignore any repository URL that has the keyword REPO_ADDR...
##### WARNING: No python pip repository specified.

##### INFO: DETECTED OPERATING SYSTEM KIND: rhel
##### INFO: DETECTED OPERATING SYSTEM VERSION: 7.2.1511 (7)
##### INFO: DETECTED OPERATING SYSTEM NAME: core
##### INFO: DETECTED ARCHITECTURE: x86_64


##### INFO: This node will be prepared as an Orchestration Node. The full set of dependencies will be installed.

(0) Checking passwordless sudo for the user "centos" by executing the command "sudo -S ls < /dev/null;" (sudo-configure)...
RESULT: ANY >= ANY OK.

(1) Checking "repo" version by executing the command "ls -la /tmp/repoupdated;" (repo-configure)...
RESULT: NOT OK (PMgr Exception).
ACTION:  Please install/configure "repo" by issuing the following command: "sudo mv -f /tmp/*.repo /etc/yum.repos.d; touch /tmp/repoupdated;sudo systemctl stop iptables; sudo systemctl disable iptables;sudo systemctl stop firewalld; sudo systemctl disable firewalld; exit 0;"

(1) Installing "repo" by executing the command "sudo mv -f /tmp/*.repo /etc/yum.repos.d; touch /tmp/repoupdated;sudo systemctl stop iptables; sudo systemctl disable iptables;sudo systemctl stop firewalld; sudo systemctl disable firewalld; exit 0;" (rhel-repo-install-man,)...
Configuring repository "rhel-rpmforge"... Valid URL found: http://apt.sw.be/redhat/el7/en/x86_64/rpmforge/.
Configuring repository "rhel-epel"... Valid URL found: http://mirror.itc.virginia.edu/fedora-epel/7/x86_64/.
Configuring repository "rhel-centos"... Valid URL found: http://mirror.net.cen.ct.gov/centos/7.2.1511/os/x86_64/.
RESULT: DONE OK.

(2) Checking "ifconfig" version by executing the command "ifconfig;" (ifconfig-configure)...
RESULT: ANY >= ANY OK.

(3) Checking "ip" version by executing the command "ip -V;" (ip-configure)...
RESULT: ANY >= ANY OK.

(4) Checking "pkill" version by executing the command "pkill -V 2>&1 | cut -d ' ' -f 4;" (pkill-configure)...
RESULT: ANY >= ANY OK.

(5) Checking "which" version by executing the command "which;" (which-configure)...
RESULT: NOT OK (PMgr Exception).
ACTION:  Please install/configure "which" by issuing the following command: "sudo yum -y install  which;sudo yum -y install  redhat-lsb-core;"

(5) Installing "which" by executing the command "sudo yum -y install  which;sudo yum -y install  redhat-lsb-core;" (rhel-which-install-pm,rhel-which-postinstall-pm)...
RESULT: DONE OK.

(6) Checking "ntp" version by executing the command "ntpd -V 2>&1 | grep Ver | cut -d ' ' -f 8;" (ntp-configure)...
RESULT: ANY >= ANY OK.

(7) Checking "git" version by executing the command "git --version | cut -d ' ' -f 3;" (git-configure)...
RESULT: 1.8.3.1 >= 1.6.0 OK.

(8) Checking "wget" version by executing the command "wget -V | head -n 1 | cut -d ' ' -f 3;" (wget-configure)...
RESULT:  NOT OK.
ACTION:  Please install/configure "wget" by issuing the following command: "sudo yum -y install  wget;"

(8) Installing "wget" by executing the command "sudo yum -y install  wget;" (common-wget-install-pm,)...
RESULT: DONE OK.

(9) Checking "pip" version by executing the command "pip --version | cut -d ' ' -f 2;" (pip-configure)...
RESULT:  NOT OK.
ACTION:  Please install/configure "pip" by issuing the following command: "sudo yum -y install  python-pip;"

(9) Installing "pip" by executing the command "sudo yum -y install  python-pip;" (common-pip-install-pm,)...
RESULT: DONE OK.

(10) Checking "gcc" version by executing the command "gcc -v 2>&1 | grep -v Configured | grep version | cut -d ' ' -f 3;" (gcc-configure)...
RESULT:  NOT OK.
ACTION:  Please install/configure "gcc" by issuing the following command: "sudo yum -y install  gcc;"

(10) Installing "gcc" by executing the command "sudo yum -y install  gcc;" (common-gcc-install-pm,)...
RESULT: DONE OK.

(11) Checking "make" version by executing the command "make -v | head -n1 | cut -d ' ' -f 3;" (make-configure)...
RESULT: 3.82 >= 3.5 OK.

(13) Checking "sshpass" version by executing the command "sshpass -V | grep sshpass | head -n 1 | cut -d ' ' -f 2;" (sshpass-configure)...
RESULT:  NOT OK.
ACTION:  Please install/configure "sshpass" by issuing the following command: "sudo yum -y install  sshpass;"

(13) Installing "sshpass" by executing the command "sudo yum -y install  sshpass;" (common-sshpass-install-pm,)...
RESULT: DONE OK.

(14) Checking "curl" version by executing the command "curl -V | head -n 1 | cut -d ' ' -f 2;" (curl-configure)...
RESULT: 7.29.0 >= 7.0 OK.

(15) Checking "screen" version by executing the command "screen -v | grep version;" (screen-configure)...
RESULT: NOT OK (PMgr Exception).
ACTION:  Please install/configure "screen" by issuing the following command: "sudo yum -y install  screen;"

(15) Installing "screen" by executing the command "sudo yum -y install  screen;" (common-screen-install-pm,)...
RESULT: DONE OK.

(16) Checking "rsync" version by executing the command "rsync --version | grep version;" (rsync-configure)...
RESULT: 3.0.930 >= 2.6 OK.

(17) Checking "ncftp" version by executing the command "ncftp -h 2>&1 | grep Program | cut -d ' ' -f 5 | sed -e 's/\//./g';" (ncftp-configure)...
RESULT:  NOT OK.
ACTION:  Please install/configure "ncftp" by issuing the following command: "sudo yum -y install  ncftp;"

(17) Installing "ncftp" by executing the command "sudo yum -y install  ncftp;" (common-ncftp-install-pm,)...
RESULT: DONE OK.

(18) Checking "lftp" version by executing the command "lftp --version | grep Version | cut -d " " -f 4;" (lftp-configure)...
RESULT:  NOT OK.
ACTION:  Please install/configure "lftp" by issuing the following command: "sudo yum -y install  lftp;"

(18) Installing "lftp" by executing the command "sudo yum -y install  lftp;" (common-lftp-install-pm,)...
RESULT: DONE OK.

(19) Checking "netcat" version by executing the command "netcat -v -w 1 localhost -z 22;" (netcat-configure)...
RESULT: NOT OK (PMgr Exception).
ACTION:  Please install/configure "netcat" by issuing the following command: "wget -N -P /home/centos/osgcloud/cbtool/3rd_party ftp://ftp.pbone.net/mirror/ftp.opensuse.org/distribution/11.4/repo/oss/suse/x86_64/netcat-openbsd-1.89-74.1.x86_64.rpm; cd /home/centos/osgcloud/cbtool/3rd_party;rpm2cpio /home/centos/osgcloud/cbtool/3rd_party/netcat-openbsd*.rpm | cpio -i --make-directories;sudo mv /home/centos/osgcloud/cbtool/3rd_party/usr/bin/nc /usr/local/bin/netcat; rm -rf /home/centos/osgcloud/cbtool/3rd_party/usr;"

(19) Installing "netcat" by executing the command "wget -N -P /home/centos/osgcloud/cbtool/3rd_party ftp://ftp.pbone.net/mirror/ftp.opensuse.org/distribution/11.4/repo/oss/suse/x86_64/netcat-openbsd-1.89-74.1.x86_64.rpm; cd /home/centos/osgcloud/cbtool/3rd_party;rpm2cpio /home/centos/osgcloud/cbtool/3rd_party/netcat-openbsd*.rpm | cpio -i --make-directories;sudo mv /home/centos/osgcloud/cbtool/3rd_party/usr/bin/nc /usr/local/bin/netcat; rm -rf /home/centos/osgcloud/cbtool/3rd_party/usr;" (rhel-netcat-preinstall-man,rhel-netcat-install-man,rhel-netcat-postinstall-man)...
RESULT: DONE OK.

(20) Checking "nmap" version by executing the command "nmap -V | grep version | cut -d ' ' -f 3;" (nmap-configure)...
RESULT:  NOT OK.
ACTION:  Please install/configure "nmap" by issuing the following command: "sudo yum -y install  nmap;"

(20) Installing "nmap" by executing the command "sudo yum -y install  nmap;" (common-nmap-install-pm,)...
RESULT: DONE OK.

(21) Checking "openvpn" version by executing the command "openvpn --version | grep built | cut -d ' ' -f 2;" (openvpn-configure)...
RESULT:  NOT OK.
ACTION:  Please install/configure "openvpn" by issuing the following command: "sudo yum -y install  openvpn;sudo ln -s /usr/sbin/openvpn /usr/local/bin/openvpn;"

(21) Installing "openvpn" by executing the command "sudo yum -y install  openvpn;sudo ln -s /usr/sbin/openvpn /usr/local/bin/openvpn;" (common-openvpn-install-pm,common-openvpn-postinstall-pm)...
RESULT: DONE OK.

(22) Checking "gmond" version by executing the command "gmond --version | cut -d ' ' -f 2;" (gmond-configure)...
RESULT:  NOT OK.
ACTION:  Please install/configure "gmond" by issuing the following command: "sudo yum -y install  ganglia-gmond-python ganglia;sudo ln -s /usr/sbin/gmond /usr/local/bin/gmond;sudo systemctl stop gmond; sudo systemctl disable gmond;"

(22) Installing "gmond" by executing the command "sudo yum -y install  ganglia-gmond-python ganglia;sudo ln -s /usr/sbin/gmond /usr/local/bin/gmond;sudo systemctl stop gmond; sudo systemctl disable gmond;" (rhel-gmond-install-pm,rhel-gmond-postinstall-pm)...
RESULT: DONE OK.

(24) Checking "rsyslog" version by executing the command "rsyslogd -v | grep compiled | cut -d ' ' -f 2 | sed 's/,//g';" (rsyslog-configure)...
RESULT: 7.4.7 >= 4.6.0 OK.

(26) Checking "apache" version by executing the command "sudo apachectl -v | grep version | cut -d '/' -f 2 | cut -d ' ' -f 1;" (apache-configure)...
RESULT:  NOT OK.
ACTION:  Please install/configure "apache" by issuing the following command: "sudo yum -y install  httpd;"

(26) Installing "apache" by executing the command "sudo yum -y install  httpd;" (rhel-apache-install-pm,)...
RESULT: DONE OK.

(27) Checking "redis" version by executing the command "redis-server -v | sed 's/[^0-9]*//g';" (redis-configure)...
RESULT:  NOT OK.
ACTION:  Please install/configure "redis" by issuing the following command: "sudo yum -y install  redis;sudo sed -i "s/.*bind 127.0.0.1/bind 0.0.0.0/" /etc/redis.conf;sudo systemctl restart redis; sudo systemctl enable redis;"

(27) Installing "redis" by executing the command "sudo yum -y install  redis;sudo sed -i "s/.*bind 127.0.0.1/bind 0.0.0.0/" /etc/redis.conf;sudo systemctl restart redis; sudo systemctl enable redis;" (rhel-redis-install-man,rhel-redis-postinstall-man)...
RESULT: DONE OK.

(28) Checking "mongodb" version by executing the command " mongod --version;" (mongodb-configure)...
RESULT: NOT OK (PMgr Exception).
ACTION:  Please install/configure "mongodb" by issuing the following command: "sudo yum -y install sudo  mongodb mongodb-server;sudo sed -i "s/.*bind_ip.*/bind_ip=0.0.0.0/" /etc/mongod.conf;sudo systemctl restart mongod; sudo systemctl enable mongod;"

(28) Installing "mongodb" by executing the command "sudo yum -y install sudo  mongodb mongodb-server;sudo sed -i "s/.*bind_ip.*/bind_ip=0.0.0.0/" /etc/mongod.conf;sudo systemctl restart mongod; sudo systemctl enable mongod;" (rhel-mongodb-install-man,rhel-mongodb-postinstall-man)...
RESULT: DONE OK.

(30) Checking "python-devel" version by executing the command "ls -la $(python -c "from distutils import sysconfig as s; print s.get_config_vars()['INCLUDEPY']")/Python.h;" (python-devel-configure)...
RESULT: NOT OK (PMgr Exception).
ACTION:  Please install/configure "python-devel" by issuing the following command: "sudo yum -y install  python-devel;"

(30) Installing "python-devel" by executing the command "sudo yum -y install  python-devel;" (rhel-python-devel-install-pm,)...
RESULT: DONE OK.

(31) Checking "python-setuptools" version by executing the command "python -c "import setuptools; from setuptools import sandbox";" (python-setuptools-configure)...
RESULT: ANY >= ANY OK.

(32) Checking "python-prettytable" version by executing the command "python -c "import prettytable; print str(prettytable.__version__).strip()";" (python-prettytable-configure)...
RESULT: 0.7.2 >= 0.6 OK.

(33) Checking "python-daemon" version by executing the command "python -c "import daemon; print str(daemon._version).strip()";" (python-daemon-configure)...
RESULT: NOT OK (PMgr Exception).
ACTION:  Please install/configure "python-daemon" by issuing the following command: "sudo yum -y install  python-daemon;"

(33) Installing "python-daemon" by executing the command "sudo yum -y install  python-daemon;" (common-python-daemon-install-pm,)...
RESULT: DONE OK.

(34) Checking "python-twisted" version by executing the command "python -c "import twisted; from twisted.web.wsgi import WSGIResource; from twisted.internet import reactor; from twisted.web.static import File; from twisted.web.resource import Resource; from twisted.web.server import Site; from twisted.web import wsgi; print str(twisted.__version__).strip()";" (python-twisted-configure)...
RESULT: NOT OK (PMgr Exception).
ACTION:  Please install/configure "python-twisted" by issuing the following command: "sudo pip install --upgrade twisted;"

(34) Installing "python-twisted" by executing the command "sudo pip install --upgrade twisted;" (common-python-twisted-install-man,)...
RESULT: DONE OK.

(35) Checking "python-webob" version by executing the command "python -c "import webob; from webob import Request, Response, exc";" (python-webob-configure)...
RESULT: NOT OK (PMgr Exception).
ACTION:  Please install/configure "python-webob" by issuing the following command: "sudo pip install --upgrade webob;"

(35) Installing "python-webob" by executing the command "sudo pip install --upgrade webob;" (common-python-webob-install-man,)...
RESULT: DONE OK.

(36) Checking "python-beaker" version by executing the command "python -c "import beaker; from beaker.middleware import SessionMiddleware";" (python-beaker-configure)...
RESULT: NOT OK (PMgr Exception).
ACTION:  Please install/configure "python-beaker" by issuing the following command: "sudo yum -y install  python-beaker;"

(36) Installing "python-beaker" by executing the command "sudo yum -y install  python-beaker;" (common-python-beaker-install-pm,)...
RESULT: DONE OK.

(37) Checking "pyredis" version by executing the command "python -c "import redis; print str(redis.VERSION).replace('(','').replace(')','').replace(', ','.').strip()";" (pyredis-configure)...
RESULT: NOT OK (PMgr Exception).
ACTION:  Please install/configure "pyredis" by issuing the following command: "sudo pip install --upgrade  redis;"

(37) Installing "pyredis" by executing the command "sudo pip install --upgrade  redis;" (common-pyredis-install-pip,)...
RESULT: DONE OK.

(38) Checking "pymongo" version by executing the command "python -c "import pymongo; print str(pymongo.version).strip().replace('+','')";" (pymongo-configure)...
RESULT: NOT OK (PMgr Exception).
ACTION:  Please install/configure "pymongo" by issuing the following command: "sudo pip install --upgrade  pymongo;"

(38) Installing "pymongo" by executing the command "sudo pip install --upgrade  pymongo;" (common-pymongo-install-pip,)...
RESULT: DONE OK.

(39) Checking "pylibvirt" version by executing the command "python -c "import libvirt; print str(libvirt.getVersion()).strip()";" (pylibvirt-configure)...
RESULT: NOT OK (PMgr Exception).
ACTION:  Please install/configure "pylibvirt" by issuing the following command: "sudo yum -y install  libvirt-python;"

(39) Installing "pylibvirt" by executing the command "sudo yum -y install  libvirt-python;" (rhel-pylibvirt-install-pm,)...
RESULT: DONE OK.

(40) Checking "pypureomapi" version by executing the command "python -c "import pypureomapi; print str(pypureomapi.__version__).strip()";" (pypureomapi-configure)...
RESULT: NOT OK (PMgr Exception).
ACTION:  Please install/configure "pypureomapi" by issuing the following command: "sudo pip install --upgrade  pypureomapi;"

(40) Installing "pypureomapi" by executing the command "sudo pip install --upgrade  pypureomapi;" (common-pypureomapi-install-pip,)...
RESULT: DONE OK.

(41) Checking "pyhtml" version by executing the command "python -c "import HTML; print str(HTML.__version__).strip()";" (pyhtml-configure)...
RESULT: NOT OK (PMgr Exception).
ACTION:  Please install/configure "pyhtml" by issuing the following command: "cd /home/centos/osgcloud/cbtool/3rd_party; git clone https://github.com/ibmcb/HTML.py;cd HTML.py; sudo python setup.py install;"

(41) Installing "pyhtml" by executing the command "cd /home/centos/osgcloud/cbtool/3rd_party; git clone https://github.com/ibmcb/HTML.py;cd HTML.py; sudo python setup.py install;" (common-pyhtml-preinstall-git,common-pyhtml-install-git,)...
RESULT: DONE OK.

(42) Checking "gmetad-python" version by executing the command "ls -la /home/centos/osgcloud/cbtool/3rd_party/monitor-core/gmetad-python/gmetad.py;" (gmetad-python-configure)...
RESULT: NOT OK (PMgr Exception).
ACTION:  Please install/configure "gmetad-python" by issuing the following command: "cd /home/centos/osgcloud/cbtool/3rd_party; git clone https://github.com/ibmcb/monitor-core.git;"

(42) Installing "gmetad-python" by executing the command "cd /home/centos/osgcloud/cbtool/3rd_party; git clone https://github.com/ibmcb/monitor-core.git;" (common-gmetad-python-preinstall-git,,)...
RESULT: DONE OK.

(43) Checking "bootstrap" version by executing the command "ls -la /home/centos/osgcloud/cbtool/3rd_party/bootstrap/package.json;" (bootstrap-configure)...
RESULT: NOT OK (PMgr Exception).
ACTION:  Please install/configure "bootstrap" by issuing the following command: "cd /home/centos/osgcloud/cbtool/3rd_party; git clone https://github.com/ibmcb/bootstrap.git;"

(43) Installing "bootstrap" by executing the command "cd /home/centos/osgcloud/cbtool/3rd_party; git clone https://github.com/ibmcb/bootstrap.git;" (common-bootstrap-preinstall-git,,)...
RESULT: DONE OK.

(44) Checking "bootstrap-wizard" version by executing the command "ls -la /home/centos/osgcloud/cbtool/3rd_party/Bootstrap-Wizard/README.md;" (bootstrap-wizard-configure)...
RESULT: NOT OK (PMgr Exception).
ACTION:  Please install/configure "bootstrap-wizard" by issuing the following command: "cd /home/centos/osgcloud/cbtool/3rd_party; git clone https://github.com/ibmcb/Bootstrap-Wizard.git;"

(44) Installing "bootstrap-wizard" by executing the command "cd /home/centos/osgcloud/cbtool/3rd_party; git clone https://github.com/ibmcb/Bootstrap-Wizard.git;" (common-bootstrap-wizard-preinstall-git,,)...
RESULT: DONE OK.

(45) Checking "streamprox" version by executing the command "ls -la /home/centos/osgcloud/cbtool/3rd_party/StreamProx/README.md;" (streamprox-configure)...
RESULT: NOT OK (PMgr Exception).
ACTION:  Please install/configure "streamprox" by issuing the following command: "cd /home/centos/osgcloud/cbtool/3rd_party; git clone https://github.com/ibmcb/StreamProx.git;"

(45) Installing "streamprox" by executing the command "cd /home/centos/osgcloud/cbtool/3rd_party; git clone https://github.com/ibmcb/StreamProx.git;" (common-streamprox-preinstall-git,,)...
RESULT: DONE OK.

(46) Checking "d3" version by executing the command "ls -la /home/centos/osgcloud/cbtool/3rd_party/d3/component.json;" (d3-configure)...
RESULT: NOT OK (PMgr Exception).
ACTION:  Please install/configure "d3" by issuing the following command: "cd /home/centos/osgcloud/cbtool/3rd_party; git clone https://github.com/ibmcb/d3.git;"

(46) Installing "d3" by executing the command "cd /home/centos/osgcloud/cbtool/3rd_party; git clone https://github.com/ibmcb/d3.git;" (common-d3-preinstall-git,,)...
RESULT: DONE OK.

(47) Checking "novaclient" version by executing the command "python -c "import novaclient; from novaclient.v1_1 import client";" (novaclient-configure)...
RESULT: NOT OK (PMgr Exception).
ACTION:  Please install/configure "novaclient" by issuing the following command: "sudo pip install --upgrade  pbr; sudo pip install --upgrade  netifaces;sudo pip install --upgrade  python-novaclient;"

(47) Installing "novaclient" by executing the command "sudo pip install --upgrade  pbr; sudo pip install --upgrade  netifaces;sudo pip install --upgrade  python-novaclient;" (common-novaclient-preinstall-pip,common-novaclient-install-pip,)...
RESULT: DONE OK.

(49) Checking "softlayer" version by executing the command "python -c "import SoftLayer; print "SoftLayer.__version__".replace('v','')";" (softlayer-configure)...
RESULT: NOT OK (PMgr Exception).
ACTION:  Please install/configure "softlayer" by issuing the following command: "sudo pip install --upgrade  softlayer;"

(49) Installing "softlayer" by executing the command "sudo pip install --upgrade  softlayer;" (common-softlayer-install-pip,)...
RESULT: DONE OK.

(48) Checking "neutronclient" version by executing the command "python -c "import neutronclient; from neutronclient.v2_0 import client";" (neutronclient-configure)...
RESULT: NOT OK (PMgr Exception).
ACTION:  Please install/configure "neutronclient" by issuing the following command: "sudo pip install --upgrade  python-neutronclient;"

(48) Installing "neutronclient" by executing the command "sudo pip install --upgrade  python-neutronclient;" (common-neutronclient-install-pip,)...
RESULT: DONE OK.

(50) Checking "boto" version by executing the command "python -c "import boto; print str(boto.__version__).strip().replace('-dev','')";" (boto-configure)...
RESULT: 2.25.0 >= 2.1.8 OK.

(51) Checking "libcloud" version by executing the command "python -c "import libcloud; print str(libcloud.__version__).replace('-dev','').strip()";" (libcloud-configure)...
RESULT: NOT OK (PMgr Exception).
ACTION:  Please install/configure "libcloud" by issuing the following command: "sudo pip install --upgrade  apache-libcloud;"

(51) Installing "libcloud" by executing the command "sudo pip install --upgrade  apache-libcloud;" (common-libcloud-install-pip,)...
RESULT: DONE OK.

(52) Checking "gcloud" version by executing the command "gcloud -v | grep SDK | cut -d ' ' -f 4;" (gcloud-configure)...
RESULT:  NOT OK.
ACTION:  Please install/configure "gcloud" by issuing the following command: " export CLOUDSDK_CORE_DISABLE_PROMPTS=1 && curl https://sdk.cloud.google.com | bash;"

(52) Installing "gcloud" by executing the command " export CLOUDSDK_CORE_DISABLE_PROMPTS=1 && curl https://sdk.cloud.google.com | bash;" (common-gcloud-install-man,)...
RESULT: DONE OK.

(53) Checking "pygce" version by executing the command "python -c "from oauth2client.client import GoogleCredentials; from googleapiclient.discovery import build";" (pygce-configure)...
RESULT: NOT OK (PMgr Exception).
ACTION:  Please install/configure "pygce" by issuing the following command: " sudo pip install --upgrade  gcloud google-api-python-client;"

(53) Installing "pygce" by executing the command " sudo pip install --upgrade  gcloud google-api-python-client;" (common-pygce-install-pip,)...
RESULT: NOT OK (PMgr Exception).There was an error while installing "pygce".: Error while executing the command line " sudo pip install --upgrade  gcloud google-api-python-client;" (returncode = 10230) :You are using pip version 7.1.0, however version 8.0.2 is available.
You should consider upgrading via the 'pip install --upgrade pip' command.
Command "/usr/bin/python -c "import setuptools, tokenize;__file__='/tmp/pip-build-BGyxqI/cffi/setup.py';exec(compile(getattr(tokenize, 'open', open)(__file__).read().replace('\r\n', '\n'), __file__, 'exec'))" install --record /tmp/pip-EK45jO-record/install-record.txt --single-version-externally-managed --compile" failed with error code 1 in /tmp/pip-build-BGyxqI/cffi


(56) Checking "R" version by executing the command "R --version | grep version | grep -v GNU;" (R-configure)...
RESULT: NOT OK (PMgr Exception).
ACTION:  Please install/configure "R" by issuing the following command: "sudo yum -y install  R;"

(56) Installing "R" by executing the command "sudo yum -y install  R;" (rhel-R-install-pm,)...
RESULT: DONE OK.

(55) Checking "iptables" version by executing the command "sudo iptables -v 2>&1 | grep v | cut -d ' ' -f 2 | sed 's/v//g' | sed 's/://g';" (iptables-configure)...
RESULT: 1.4.21 >= 1.2 OK.

(57) Checking "sshkey" version by executing the command "ls /home/centos/osgcloud/cbtool/credentials//cbtool_rsa;" (sshkey-configure)...
RESULT: ANY >= ANY OK.

(58) Checking "sshd" version by executing the command "sudo cat /etc/ssh/sshd_config | grep -v ^# | grep UseDNS | grep no;" (sshd-configure)...
RESULT: ANY >= ANY OK.

(59) Checking "pssh" version by executing the command "sudo ln -s /usr/bin/parallel-ssh /usr/local/bin/pssh; pssh --help;" (pssh-configure)...
RESULT: NOT OK (PMgr Exception).
ACTION:  Please install/configure "pssh" by issuing the following command: "sudo yum -y install  pssh;"

(59) Installing "pssh" by executing the command "sudo yum -y install  pssh;" (common-pssh-install-pm,)...
RESULT: DONE OK.

(60) Checking "docutils" version by executing the command "python -c "import docutils; print str(docutils.__version__).strip()";" (docutils-configure)...
RESULT: NOT OK (PMgr Exception).
ACTION:  Please install/configure "docutils" by issuing the following command: "sudo pip install --upgrade docutils;"

(60) Installing "docutils" by executing the command "sudo pip install --upgrade docutils;" (common-docutils-install-pip,)...
RESULT: DONE OK.

(61) Checking "setuptools" version by executing the command "python -c "import setuptools; print str(setuptools.__version__).strip()";" (setuptools-configure)...
RESULT: 19.6.2 >= 7.0 OK.

(62) Checking "markup" version by executing the command "python -c "import markup;";" (markup-configure)...
RESULT: NOT OK (PMgr Exception).
ACTION:  Please install/configure "markup" by issuing the following command: "sudo pip install --upgrade markup;"

(62) Installing "markup" by executing the command "sudo pip install --upgrade markup;" (common-markup-install-pip,)...
RESULT: DONE OK.

(63) Checking "pyyaml" version by executing the command "python -c "import yaml; print str(yaml.__version__).strip()";" (pyyaml-configure)...
RESULT: 3.11 >= 3.10 OK.

(64) Checking "ruamelyaml" version by executing the command "python -c "import ruamel.yaml; print ruamel.yaml.__version__";" (ruamelyaml-configure)...
RESULT: NOT OK (PMgr Exception).
ACTION:  Please install/configure "ruamelyaml" by issuing the following command: "sudo pip install --upgrade ruamel.yaml;"

(64) Installing "ruamelyaml" by executing the command "sudo pip install --upgrade ruamel.yaml;" (common-ruamelyaml-install-pip,)...
RESULT: DONE OK.

There are 1 dependencies missing: pygce
Please add the missing dependency(ies) and re-run install again.
Keep rerunning the install command until there are no issues. Here is what a successful output looks like:
[centos@centos-cbtool osgcloud]$ ./cbtool/install -r orchestrator
Installing dependencies for Cloud Rapid Experimentation Analysis and Toolkit (cbtool) on this node.........


##### INFO: File "/home/centos/osgcloud/cbtool//configs/templates//PUBLIC_dependencies.txt" opened and loaded....
##### WARNING: File "/home/centos/osgcloud/cbtool//configs/templates//IBM_dependencies.txt" IGNORED....
##### WARNING: File "/home/centos/osgcloud/cbtool//configs/templates//SPEC_dependencies.txt" IGNORED....
##### WARNING: No package repository specified. Will ignore any repository URL that has the keyword REPO_ADDR...
##### WARNING: No python pip repository specified.


##### INFO: DETECTED OPERATING SYSTEM KIND: rhel
##### INFO: DETECTED OPERATING SYSTEM VERSION: 7.2.1511 (7)
##### INFO: DETECTED OPERATING SYSTEM NAME: core
##### INFO: DETECTED ARCHITECTURE: x86_64


##### INFO: This node will be prepared as an Orchestration Node. The full set of dependencies will be installed.

(0) Checking passwordless sudo for the user "centos" by executing the command "sudo -S ls < /dev/null;" (sudo-configure)...
RESULT: ANY >= ANY OK.

(1) Checking "repo" version by executing the command "ls -la /tmp/repoupdated;" (repo-configure)...
RESULT: ANY >= ANY OK.

(2) Checking "ifconfig" version by executing the command "ifconfig;" (ifconfig-configure)...
RESULT: ANY >= ANY OK.

(3) Checking "ip" version by executing the command "ip -V;" (ip-configure)...
RESULT: ANY >= ANY OK.

(4) Checking "pkill" version by executing the command "pkill -V 2>&1 | cut -d ' ' -f 4;" (pkill-configure)...
RESULT: ANY >= ANY OK.

(5) Checking "which" version by executing the command "which;" (which-configure)...
RESULT: NOT OK (PMgr Exception).
ACTION:  Please install/configure "which" by issuing the following command: "sudo yum -y install  which;sudo yum -y install  redhat-lsb-core;"

(5) Installing "which" by executing the command "sudo yum -y install  which;sudo yum -y install  redhat-lsb-core;" (rhel-which-install-pm,rhel-which-postinstall-pm)...
RESULT: DONE OK.

(6) Checking "ntp" version by executing the command "ntpd -V 2>&1 | grep Ver | cut -d ' ' -f 8;" (ntp-configure)...
RESULT: ANY >= ANY OK.

(7) Checking "git" version by executing the command "git --version | cut -d ' ' -f 3;" (git-configure)...
RESULT: 1.8.3.1 >= 1.6.0 OK.

(8) Checking "wget" version by executing the command "wget -V | head -n 1 | cut -d ' ' -f 3;" (wget-configure)...
RESULT: 1.14 >= 1.00 OK.

(9) Checking "pip" version by executing the command "pip --version | cut -d ' ' -f 2;" (pip-configure)...
RESULT: 8.0.2 >= 1.5.4 OK.

(10) Checking "gcc" version by executing the command "gcc -v 2>&1 | grep -v Configured | grep version | cut -d ' ' -f 3;" (gcc-configure)...
RESULT: 4.8.5 >= 4.0 OK.

(11) Checking "make" version by executing the command "make -v | head -n1 | cut -d ' ' -f 3;" (make-configure)...
RESULT: 3.82 >= 3.5 OK.

(13) Checking "sshpass" version by executing the command "sshpass -V | grep sshpass | head -n 1 | cut -d ' ' -f 2;" (sshpass-configure)...
RESULT: 1.05 >= 1.0 OK.

(14) Checking "curl" version by executing the command "curl -V | head -n 1 | cut -d ' ' -f 2;" (curl-configure)...
RESULT: 7.29.0 >= 7.0 OK.

(15) Checking "screen" version by executing the command "screen -v | grep version;" (screen-configure)...
RESULT: 4.01.00206 >= 4.0 OK.

(16) Checking "rsync" version by executing the command "rsync --version | grep version;" (rsync-configure)...
RESULT: 3.0.930 >= 2.6 OK.

(17) Checking "ncftp" version by executing the command "ncftp -h 2>&1 | grep Program | cut -d ' ' -f 5 | sed -e 's/\//./g';" (ncftp-configure)...
RESULT: 3.2.5.474 >= 3.2.3 OK.

(18) Checking "lftp" version by executing the command "lftp --version | grep Version | cut -d " " -f 4;" (lftp-configure)...
RESULT: 4.4.8 >= 4.0 OK.

(19) Checking "netcat" version by executing the command "netcat -v -w 1 localhost -z 22;" (netcat-configure)...
RESULT: ANY >= ANY OK.

(20) Checking "nmap" version by executing the command "nmap -V | grep version | cut -d ' ' -f 3;" (nmap-configure)...
RESULT: 6.40 >= 4.0 OK.

(21) Checking "openvpn" version by executing the command "openvpn --version | grep built | cut -d ' ' -f 2;" (openvpn-configure)...
RESULT: 2.3.10 >= 2.2.0 OK.

(22) Checking "gmond" version by executing the command "gmond --version | cut -d ' ' -f 2;" (gmond-configure)...
RESULT: 3.7.2 >= 3.0 OK.

(24) Checking "rsyslog" version by executing the command "rsyslogd -v | grep compiled | cut -d ' ' -f 2 | sed 's/,//g';" (rsyslog-configure)...
RESULT: 7.4.7 >= 4.6.0 OK.

(26) Checking "apache" version by executing the command "sudo apachectl -v | grep version | cut -d '/' -f 2 | cut -d ' ' -f 1;" (apache-configure)...
RESULT: 2.4.6 >= 2.0 OK.

(27) Checking "redis" version by executing the command "redis-server -v | sed 's/[^0-9]*//g';" (redis-configure)...
RESULT: 2819000000000360640359737982 >= 2.6.0 OK.

(28) Checking "mongodb" version by executing the command " mongod --version;" (mongodb-configure)...
RESULT: 2.6.1120160201235539.118000020160201235539.11800001.0.1112013 >= 2.4.0 OK.

(30) Checking "python-devel" version by executing the command "ls -la $(python -c "from distutils import sysconfig as s; print s.get_config_vars()['INCLUDEPY']")/Python.h;" (python-devel-configure)...
RESULT: ANY >= ANY OK.

(31) Checking "python-setuptools" version by executing the command "python -c "import setuptools; from setuptools import sandbox";" (python-setuptools-configure)...
RESULT: ANY >= ANY OK.

(32) Checking "python-prettytable" version by executing the command "python -c "import prettytable; print str(prettytable.__version__).strip()";" (python-prettytable-configure)...
RESULT: 0.7.2 >= 0.6 OK.

(33) Checking "python-daemon" version by executing the command "python -c "import daemon; print str(daemon._version).strip()";" (python-daemon-configure)...
RESULT: 1.6 >= 1.5.1 OK.

(34) Checking "python-twisted" version by executing the command "python -c "import twisted; from twisted.web.wsgi import WSGIResource; from twisted.internet import reactor; from twisted.web.static import File; from twisted.web.resource import Resource; from twisted.web.server import Site; from twisted.web import wsgi; print str(twisted.__version__).strip()";" (python-twisted-configure)...
RESULT: 15.5.0 >= 8.0.0 OK.

(35) Checking "python-webob" version by executing the command "python -c "import webob; from webob import Request, Response, exc";" (python-webob-configure)...
RESULT: ANY >= ANY OK.

(36) Checking "python-beaker" version by executing the command "python -c "import beaker; from beaker.middleware import SessionMiddleware";" (python-beaker-configure)...
RESULT: ANY >= ANY OK.

(37) Checking "pyredis" version by executing the command "python -c "import redis; print str(redis.VERSION).replace('(','').replace(')','').replace(', ','.').strip()";" (pyredis-configure)...
RESULT: 2.10.5 >= 2.6.0 OK.

(38) Checking "pymongo" version by executing the command "python -c "import pymongo; print str(pymongo.version).strip().replace('+','')";" (pymongo-configure)...
RESULT: 3.2 >= 2.5 OK.

(39) Checking "pylibvirt" version by executing the command "python -c "import libvirt; print str(libvirt.getVersion()).strip()";" (pylibvirt-configure)...
RESULT: 1002017 >= 9003 OK.

(40) Checking "pypureomapi" version by executing the command "python -c "import pypureomapi; print str(pypureomapi.__version__).strip()";" (pypureomapi-configure)...
RESULT: 0.4 >= 0.3 OK.

(41) Checking "pyhtml" version by executing the command "python -c "import HTML; print str(HTML.__version__).strip()";" (pyhtml-configure)...
RESULT: 0.04 >= 0.04 OK.

(42) Checking "gmetad-python" version by executing the command "ls -la /home/centos/osgcloud/cbtool/3rd_party/monitor-core/gmetad-python/gmetad.py;" (gmetad-python-configure)...
RESULT: ANY >= ANY OK.

(43) Checking "bootstrap" version by executing the command "ls -la /home/centos/osgcloud/cbtool/3rd_party/bootstrap/package.json;" (bootstrap-configure)...
RESULT: ANY >= ANY OK.

(44) Checking "bootstrap-wizard" version by executing the command "ls -la /home/centos/osgcloud/cbtool/3rd_party/Bootstrap-Wizard/README.md;" (bootstrap-wizard-configure)...
RESULT: ANY >= ANY OK.

(45) Checking "streamprox" version by executing the command "ls -la /home/centos/osgcloud/cbtool/3rd_party/StreamProx/README.md;" (streamprox-configure)...
RESULT: ANY >= ANY OK.

(46) Checking "d3" version by executing the command "ls -la /home/centos/osgcloud/cbtool/3rd_party/d3/component.json;" (d3-configure)...
RESULT: ANY >= ANY OK.

(47) Checking "novaclient" version by executing the command "python -c "import novaclient; from novaclient.v1_1 import client";" (novaclient-configure)...
RESULT: NOT OK (PMgr Exception).
ACTION:  Please install/configure "novaclient" by issuing the following command: "sudo pip install --upgrade  pbr; sudo pip install --upgrade  netifaces;sudo pip install --upgrade  python-novaclient;"

(47) Installing "novaclient" by executing the command "sudo pip install --upgrade  pbr; sudo pip install --upgrade  netifaces;sudo pip install --upgrade  python-novaclient;" (common-novaclient-preinstall-pip,common-novaclient-install-pip,)...
RESULT: DONE OK.

(49) Checking "softlayer" version by executing the command "python -c "import SoftLayer; print "SoftLayer.__version__".replace('v','')";" (softlayer-configure)...
RESULT: 4.1.1 >= 3.1 OK.

(48) Checking "neutronclient" version by executing the command "python -c "import neutronclient; from neutronclient.v2_0 import client";" (neutronclient-configure)...
RESULT: ANY >= ANY OK.

(50) Checking "boto" version by executing the command "python -c "import boto; print str(boto.__version__).strip().replace('-dev','')";" (boto-configure)...
RESULT: 2.25.0 >= 2.1.8 OK.

(51) Checking "libcloud" version by executing the command "python -c "import libcloud; print str(libcloud.__version__).replace('-dev','').strip()";" (libcloud-configure)...
RESULT: 0.20.1 >= 0.11.0 OK.

(52) Checking "gcloud" version by executing the command "gcloud -v | grep SDK | cut -d ' ' -f 4;" (gcloud-configure)...
RESULT:  NOT OK.
ACTION:  Please install/configure "gcloud" by issuing the following command: " export CLOUDSDK_CORE_DISABLE_PROMPTS=1 && curl https://sdk.cloud.google.com | bash;"

(52) Installing "gcloud" by executing the command " export CLOUDSDK_CORE_DISABLE_PROMPTS=1 && curl https://sdk.cloud.google.com | bash;" (common-gcloud-install-man,)...
RESULT: DONE OK.

(53) Checking "pygce" version by executing the command "python -c "from oauth2client.client import GoogleCredentials; from googleapiclient.discovery import build";" (pygce-configure)...
RESULT: ANY >= ANY OK.

(56) Checking "R" version by executing the command "R --version | grep version | grep -v GNU;" (R-configure)...
RESULT: 3.2.320151210 >= 2.1 OK.

(55) Checking "iptables" version by executing the command "sudo iptables -v 2>&1 | grep v | cut -d ' ' -f 2 | sed 's/v//g' | sed 's/://g';" (iptables-configure)...
RESULT: 1.4.21 >= 1.2 OK.

(57) Checking "sshkey" version by executing the command "ls /home/centos/osgcloud/cbtool/credentials//cbtool_rsa;" (sshkey-configure)...
RESULT: ANY >= ANY OK.

(58) Checking "sshd" version by executing the command "sudo cat /etc/ssh/sshd_config | grep -v ^# | grep UseDNS | grep no;" (sshd-configure)...
RESULT: ANY >= ANY OK.

(59) Checking "pssh" version by executing the command "sudo ln -s /usr/bin/parallel-ssh /usr/local/bin/pssh; pssh --help;" (pssh-configure)...
RESULT: ANY >= ANY OK.

(60) Checking "docutils" version by executing the command "python -c "import docutils; print str(docutils.__version__).strip()";" (docutils-configure)...
RESULT: 0.12 >= 0.12 OK.

(61) Checking "setuptools" version by executing the command "python -c "import setuptools; print str(setuptools.__version__).strip()";" (setuptools-configure)...
RESULT: 19.6.2 >= 7.0 OK.

(62) Checking "markup" version by executing the command "python -c "import markup;";" (markup-configure)...
RESULT: ANY >= ANY OK.

(63) Checking "pyyaml" version by executing the command "python -c "import yaml; print str(yaml.__version__).strip()";" (pyyaml-configure)...
RESULT: 3.11 >= 3.10 OK.

(64) Checking "ruamelyaml" version by executing the command "python -c "import ruamel.yaml; print ruamel.yaml.__version__";" (ruamelyaml-configure)...
RESULT: ANY >= ANY OK.

All dependencies are in place
Checking for a "private" configuration file for user "centos" in /home/centos/osgcloud/cbtool//configs/centos_cloud_definitions.txt)
Copying /home/centos/osgcloud/cbtool//configs/cloud_definitions.txt to /home/centos/osgcloud/cbtool//configs/centos_cloud_definitions.txt...
Please re-run configure again
Check if your redis server is running by executing the following command:
sudo netstat -tulpn | grep 6379
tcp        0      0 127.0.0.1:6379          0.0.0.0:*               LISTEN      11701/redis-server
If redis is listening on 127.0.0.1, please do the following:
sudo systemctl restart redis
Make sure mongodb config reflects as following:
[root@centos-cbtool cbtool]# cat /etc/sysconfig/mongod
OPTIONS="--smallfiles --quiet -f /etc/mongod.conf"
Once the above change is made, the service needs to be restarted:
systemctl restart mongod
Then, lets start CBTOOL:
cd /home/centos/osgcloud/cbtool
./cb --soft_reset
You should see an output like this:
 [centos@centos-cbtool cbtool]$ ./cb -x
 Cbtool version is "f214c55"
 Parsing "cloud definitions" file..... "/home/centos/osgcloud/cbtool/lib/auxiliary//../..//configs/centos_cloud_definitions.txt" opened and parsed successfully.
 Checking "Object Store".....An Object Store of the kind "Redis" (shared) on node 10.148.44.159, TCP port 6379, database id "0" seems to be running.
 Checking "Log Store".....A Log Store of the kind "rsyslog" (private) on node 10.148.44.159, UDP port 5114 seems to be running.
 Checking "Metric Store".....A Metric Store of the kind "MongoDB" (shared) on node 10.148.44.159, TCP port 27017, database id "metrics" seems to be running.
 Checking "File Store".....A File Store of the kind "rsync" (private) on node 10.148.44.159, TCP port 873 seems to be running.
 Executing "hard" reset: (killing all running toolkit processes and flushing stores) before starting the experiment......
 Killing all processes... done
 Flushing Object Store... done
 Flushing Log Store... done

 Flushing Metric Store... done
 Checking for a running API service daemon.....API Service daemon was successfully started. The process id is ['3899'] (http://10.148.44.159:7070).
 Checking for a running GUI service daemon.....GUI Service daemon was successfully started. The process id is ['3921', '3922'], listening on port 8080. Full url is "http://10.148.44.159:8080".
  status: Creating "OpenVPN" VPN server unified CB configuration: /home/centos/osgcloud/cbtool/lib/operations//../../util/openvpn/make_keys.sh 192.168.0.0 255.255.0.0 MYSIMCLOUD 10.148.44.159 1194, please wait ...
 status: VPN configuration success: (192.168.0.0 255.255.0.0)
 The "sim" cloud named "MYSIMCLOUD" was successfully attached to this experiment.
 The experiment identifier is EXP-02-03-2016-12-04-27-PM-UTC

 status: VMC 4982589C-CC7A-50D6-B535-CD5AC72FCACD was successfully registered on SimCloud "MYSIMCLOUD".
 status: VMC 60BA87F7-DB96-58AC-A476-BBC330FB73CB was successfully registered on SimCloud "MYSIMCLOUD".
 status: VMC B9D96CFC-3DEB-56B5-AB4D-A41161DC876A was successfully registered on SimCloud "MYSIMCLOUD".
 status: VMC 2396C969-87BF-5889-AC0D-3F61FB594CE4 was successfully registered on SimCloud "MYSIMCLOUD".
 status: Attribute "collect_from_host" was set to "false". Skipping Host OS performance monitor daemon startup
 All VMCs successfully attached to this experiment.
(MYSIMCLOUD)
Follow the instructions on Running Benchmark with a Simulated Cloud page to run a ‘simulated mode’ of the benchmark. The details of the ‘simulated mode’ are also described in that page.
Check the version of the mongo installed. The SPEC Cloud IaaS 2016 Benchmark kit does not ship with the mongo server. It is installed as part of CBTOOL installation. The following mongo version have been tested with CBTOOL shipped in the kit:
$mongo --version
db version v2.6.11
Check the redis version installed. CBTOOL shipped with the benchmark has been tested with the following redis version:
$redis-server -v
Redis server v=2.8.19
If during subsequent installation of the benchmark, a new redis version is found not to work, the tester should install redis with the above version.
- Check python package versions. The following commands are helpful. These commands assume connectivity to Centos and Python respositories.
Install Python package manager, namely, pip:
sudo yum install python-pipList python packages:
sudo pip listInstall a python package:
sudo pip install PYTHONPACKAGE(replace PYTHONPACKAGE with the name of package being installed)
Install a python package with a version:
sudo pip install PYTHONPACKAGE==0.1Remove a python package:
sudo pip uninstall PYTHONPACKAGEIf there is an issue installing pyOpenSSL package, please make sure that you have installed libssl-dev package:
sudo yum install libssl-dev
Preparing an EC2 Benchmark Harness Image (CBTOOL and Benchmark Drivers)
- Pick an Ubuntu 14.04 x86_64 image from the Amazon image store, and create an SSH key.
- Start a VM with this image.
- t2.medium flavor for example
- Review and Launch
- Select your security group and Launch (The security group needs to open the relevant ports for CBTOOL and its applications)
- Select a key to inject (that you created earlier)
- Press Launch
ssh into your VM, get the latest updates, and git:
ssh -i YOURKEY ubuntu@[YOURVMIPADDR]
sudo apt-get update
sudo apt-get install git -y
Add your machine hostname and IP address to /etc/hosts file:
vi /etc/hosts
IPADDR HOSTNAME
Unzip the kit file into your home directory:
unzip spec_cloud_iaas_2016_*.zip
Prepare the ssh keys to be used with CBTOOL and instances.
Copy the private ssh key into .ssh directory:
echo YOURKEY >> /home/ubuntu/.ssh/id_rsa
chmod 400 /home/ubuntu/.ssh/id_rsa
Copy these keys into cbtool/credentials directory:
cp /home/ubuntu/.ssh/id_rsa /home/ubuntu/osgcloud/cbtool/credentials/cbtool_rsa
cp /home/ubuntu/.ssh/id_rsa.pub /home/ubuntu/osgcloud/cbtool/credentials/cbtool_rsa.pub
Ensure that the permissions of these keys is restrictive:
chmod 400 /home/ubuntu/osgcloud/cbtool/credentials/cbtool_rsa
chmod 400 /home/ubuntu/osgcloud/cbtool/credentials/cbtool_rsa.pub
Now, we are ready to install CBTOOL:
cd /home/osgcloud/
./cbtool/install -r orchestrator
Here is the output:
ubuntu@cbtool-spec:~/osgcloud/cbtool$ ./install -r orchestrator
Installing dependencies for Cloud Rapid Experimentation Analysis and Toolkit (cbtool) on this node.........
File "/home/ubuntu/osgcloud/cbtool//configs/templates//PUBLIC_dependencies.txt" opened and loaded....
File "/home/ubuntu/osgcloud/cbtool//configs/templates//IBM_dependencies.txt" IGNORED....
File "/home/ubuntu/osgcloud/cbtool//configs/templates//SPEC_dependencies.txt" IGNORED....
No package repository specified. Will ignore any repository URL that has the keyword REPO_ADDR...
No python pip repository specified.
#####This node will be prepared as an Orchestration Node. The full set of dependencies will be installed. #####
(0) Checking passwordless sudo for the user "ubuntu" by executing the command "sudo -S ls < /dev/null"...
RESULT: ANY >= ANY OK.

(1) Checking "repo" version by executing the command "ls -la /tmp/repoupdated"...
RESULT: NOT OK.
ACTION:  Please install/configure "repo" by issuing the following command: "sudo mv -f /tmp/*.list /etc/apt/sources.list.d/; sudo apt-get update; touch /tmp/repoupdated; source /home/ubuntu/osgcloud/cbtool/scripts//common/cb_bootstrap.sh; service_stop_disable iptables; service_stop_disable ipfw;"

(1) Installing "repo" by executing the command "sudo mv -f /tmp/*.list /etc/apt/sources.list.d/; sudo apt-get update; touch /tmp/repoupdated; source /home/ubuntu/osgcloud/cbtool/scripts//common/cb_bootstrap.sh; service_stop_disable iptables; service_stop_disable ipfw;"...
RESULT: NOT OK. There was an error while installing "repo".: Error while executing the command line "sudo mv -f /tmp/*.list /etc/apt/sources.list.d/; sudo apt-get update; touch /tmp/repoupdated; source /home/ubuntu/osgcloud/cbtool/scripts//common/cb_bootstrap.sh; service_stop_disable iptables; service_stop_disable ipfw;" (returncode = 2747) :sudo: unable to resolve host cbtool-spec
mv: cannot stat ‘/tmp/*.list’: No such file or directory
sudo: unable to resolve host cbtool-spec
/bin/sh: 1: source: not found
/bin/sh: 1: service_stop_disable: not found
/bin/sh: 1: service_stop_disable: not found


(2) Checking "ifconfig" version by executing the command "ifconfig"...
RESULT: ANY >= ANY OK.

(3) Checking "ip" version by executing the command "ip -V"...
RESULT: ANY >= ANY OK.

(4) Checking "git" version by executing the command "git --version | cut -d ' ' -f 3"...
RESULT: 1.9.1 >= 1.6.0 OK.

(5) Checking "wget" version by executing the command "wget -V | head -n 1 | cut -d ' ' -f 3"...
RESULT: 1.15 >= 1.00 OK.

(6) Checking "pip" version by executing the command "pip --version | cut -d ' ' -f 2"...
RESULT:  NOT OK.
ACTION:  Please install/configure "pip" by issuing the following command: "sudo apt-get -y install python-pip;"

(6) Installing "pip" by executing the command "sudo apt-get -y install python-pip;"...

RESULT: DONE OK.

(7) Checking "gcc" version by executing the command "gcc -v 2>&1 | grep -v Configured | grep version | cut -d ' ' -f 3"...
RESULT: 4.8.2 >= 4.0 OK.

(8) Checking "make" version by executing the command "make -v | head -n1 | cut -d ' ' -f 3"...
RESULT: 3.81 >= 3.5 OK.

(10) Checking "sshpass" version by executing the command "sshpass -V | grep sshpass | head -n 1 | cut -d ' ' -f 2"...
RESULT:  NOT OK.
ACTION:  Please install/configure "sshpass" by issuing the following command: "sudo apt-get -y install sshpass;"

(10) Installing "sshpass" by executing the command "sudo apt-get -y install sshpass;"...
RESULT: DONE OK.

(11) Checking "curl" version by executing the command "curl -V | head -n 1 | cut -d ' ' -f 2"...
RESULT: 7.35.0 >= 7.0 OK.

(12) Checking "screen" version by executing the command "screen -v | grep version"...
RESULT: 4.01.00206 >= 4.0 OK.

(13) Checking "rsync" version by executing the command "rsync --version | grep version"...
RESULT: 3.1.031 >= 2.6 OK.

(14) Checking "ncftp" version by executing the command "ncftp -h 2>&1 | grep Program | cut -d ' ' -f 5 | sed -e 's/\//./g'"...
RESULT:  NOT OK.
ACTION:  Please install/configure "ncftp" by issuing the following command: "sudo apt-get -y install ncftp;"

(14) Installing "ncftp" by executing the command "sudo apt-get -y install ncftp;"...
RESULT: DONE OK.

(15) Checking "lftp" version by executing the command "lftp --version | grep Version | cut -d " " -f 4"...
RESULT:  NOT OK.
ACTION:  Please install/configure "lftp" by issuing the following command: "sudo apt-get -y install lftp;"

(15) Installing "lftp" by executing the command "sudo apt-get -y install lftp;"...
RESULT: DONE OK.

(16) Checking "netcat" version by executing the command "netcat -v -w 1 localhost -z 22"...
RESULT: ANY >= ANY OK.

(17) Checking "nmap" version by executing the command "nmap -V | grep version | cut -d ' ' -f 3"...
RESULT:  NOT OK.
ACTION:  Please install/configure "nmap" by issuing the following command: "sudo apt-get -y install nmap;"

(17) Installing "nmap" by executing the command "sudo apt-get -y install nmap;"...
RESULT: DONE OK.

(18) Checking "openvpn" version by executing the command "openvpn --version | grep built | cut -d ' ' -f 2"...
RESULT:  NOT OK.
ACTION:  Please install/configure "openvpn" by issuing the following command: "sudo apt-get -y install openvpn;sudo ln -s /usr/sbin/openvpn /usr/local/bin/openvpn"

(18) Installing "openvpn" by executing the command "sudo apt-get -y install openvpn;sudo ln -s /usr/sbin/openvpn /usr/local/bin/openvpn"...
RESULT: DONE OK.

(19) Checking "gmond" version by executing the command "gmond --version | cut -d ' ' -f 2"...
RESULT:  NOT OK.
ACTION:  Please install/configure "gmond" by issuing the following command: "sudo apt-get -y install ganglia-monitor;sudo ln -s /usr/sbin/gmond /usr/local/bin/gmond; sudo bash -c "echo 'manual' > /etc/init/ganglia-monitor.override""

(19) Installing "gmond" by executing the command "sudo apt-get -y install ganglia-monitor;sudo ln -s /usr/sbin/gmond /usr/local/bin/gmond; sudo bash -c "echo 'manual' > /etc/init/ganglia-monitor.override""...
RESULT: DONE OK.

(20) Checking "chef-client" version by executing the command "knife -v | cut -d ' ' -f 2"...
There are 1 dependencies missing: None of the urls indicated to install "chef-client" (https://opscode-omnibus-packages.s3.amazonaws.com/ubuntu/12.04/x86_64/chef_11.10.4-1.ubuntu.12.04_amd64.deb,) seem to be functional.
Please add the missing dependency(ies) and re-run install again.
Keep rerunning the install command until there are no issues. Here is what a successful output looks like:
./install -r orchestrator

ubuntu@cbtool-spec:~/osgcloud/cbtool$ sudo ./install -r orchestrator
sudo: unable to resolve host cbtool-spec
Installing dependencies for Cloud Rapid Experimentation Analysis and Toolkit (cbtool) on this node.........
File "/home/ubuntu/osgcloud/cbtool//configs/templates//PUBLIC_dependencies.txt" opened and loaded....
File "/home/ubuntu/osgcloud/cbtool//configs/templates//IBM_dependencies.txt" IGNORED....
File "/home/ubuntu/osgcloud/cbtool//configs/templates//SPEC_dependencies.txt" IGNORED....
No package repository specified. Will ignore any repository URL that has the keyword REPO_ADDR...
No python pip repository specified.
#####This node will be prepared as an Orchestration Node. The full set of dependencies will be installed. #####
(0) Checking passwordless sudo for the user "root" by executing the command "sudo -S ls < /dev/null"...
RESULT: ANY >= ANY OK.

(1) Checking "repo" version by executing the command "ls -la /tmp/repoupdated"...
RESULT: ANY >= ANY OK.

(2) Checking "ifconfig" version by executing the command "ifconfig"...
RESULT: ANY >= ANY OK.

(3) Checking "ip" version by executing the command "ip -V"...
RESULT: ANY >= ANY OK.

(4) Checking "git" version by executing the command "git --version | cut -d ' ' -f 3"...
RESULT: 1.9.1 >= 1.6.0 OK.

(5) Checking "wget" version by executing the command "wget -V | head -n 1 | cut -d ' ' -f 3"...
RESULT: 1.15 >= 1.00 OK.

(6) Checking "pip" version by executing the command "pip --version | cut -d ' ' -f 2"...
RESULT: 1.5.4 >= 1.0 OK.

(7) Checking "gcc" version by executing the command "gcc -v 2>&1 | grep -v Configured | grep version | cut -d ' ' -f 3"...
RESULT: 4.8.2 >= 4.0 OK.

(8) Checking "make" version by executing the command "make -v | head -n1 | cut -d ' ' -f 3"...
RESULT: 3.81 >= 3.5 OK.

(10) Checking "sshpass" version by executing the command "sshpass -V | grep sshpass | head -n 1 | cut -d ' ' -f 2"...
RESULT: 1.05 >= 1.0 OK.

(11) Checking "curl" version by executing the command "curl -V | head -n 1 | cut -d ' ' -f 2"...
RESULT: 7.35.0 >= 7.0 OK.

(12) Checking "screen" version by executing the command "screen -v | grep version"...
RESULT: 4.01.00206 >= 4.0 OK.

(13) Checking "rsync" version by executing the command "rsync --version | grep version"...
RESULT: 3.1.031 >= 2.6 OK.

(14) Checking "ncftp" version by executing the command "ncftp -h 2>&1 | grep Program | cut -d ' ' -f 5 | sed -e 's/\//./g'"...
RESULT: 3.2.5.474 >= 3.2.3 OK.

(15) Checking "lftp" version by executing the command "lftp --version | grep Version | cut -d " " -f 4"...
RESULT: 4.4.13 >= 4.0 OK.

(16) Checking "netcat" version by executing the command "netcat -v -w 1 localhost -z 22"...
RESULT: ANY >= ANY OK.

(17) Checking "nmap" version by executing the command "nmap -V | grep version | cut -d ' ' -f 3"...
RESULT: 6.40 >= 4.0 OK.

(18) Checking "openvpn" version by executing the command "openvpn --version | grep built | cut -d ' ' -f 2"...
RESULT: 2.3.2 >= 2.2.0 OK.

(19) Checking "gmond" version by executing the command "gmond --version | cut -d ' ' -f 2"...
RESULT: 3.6.0 >= 3.0 OK.

(20) Checking "chef-client" version by executing the command "knife -v | cut -d ' ' -f 2"...
RESULT: 11.10.4 >= 11.4.0 OK.

(21) Checking "rsyslog" version by executing the command "rsyslogd -v | grep compiled | cut -d ' ' -f 2 | sed 's/,//g'"...
RESULT: 7.4.4 >= 4.6.0 OK.

(23) Checking "apache" version by executing the command "sudo apachectl -v | grep version | cut -d '/' -f 2 | cut -d ' ' -f 1"...
RESULT: 2.4.7 >= 2.0 OK.

(24) Checking "redis" version by executing the command "redis-server -v | sed 's/[^0-9]*//g'"...
RESULT: 284000000000341644405760659 >= 2.6.0 OK.

(25) Checking "mongodb" version by executing the command " mongod --version"...
RESULT: 2.4.93190011.82652021959325620573864029 >= 2.4.0 OK.

(27) Checking "python-devel" version by executing the command "python -c "from distutils import sysconfig as s; print s.get_config_vars()['INCLUDEPY']""...
RESULT: ANY >= ANY OK.

(28) Checking "python-setuptools" version by executing the command "python -c "import setuptools; from setuptools import sandbox""...
RESULT: ANY >= ANY OK.

(29) Checking "python-prettytable" version by executing the command "python -c "import prettytable; print str(prettytable.__version__).strip()""...
RESULT: 0.7.2 >= 0.6 OK.

(30) Checking "python-daemon" version by executing the command "python -c "import daemon; print str(daemon._version).strip()""...
RESULT: 1.5.5 >= 1.5.1 OK.

(31) Checking "python-twisted" version by executing the command "python -c "import twisted; from twisted.web.wsgi import WSGIResource; from twisted.internet import reactor; from twisted.web.static import File; from twisted.web.resource import Resource; from twisted.web.server import Site; from twisted.web import wsgi; print str(twisted.__version__).strip()""...
RESULT: 13.2.0 >= 8.0.0 OK.

(32) Checking "python-webob" version by executing the command "python -c "import webob; from webob import Request, Response, exc""...
RESULT: ANY >= ANY OK.

(33) Checking "python-beaker" version by executing the command "python -c "import beaker; from beaker.middleware import SessionMiddleware""...
RESULT: ANY >= ANY OK.

(34) Checking "pyredis" version by executing the command "python -c "import redis; print str(redis.VERSION).replace('(','').replace(')','').replace(', ','.').strip()""...
RESULT: 2.10.3 >= 2.6.0 OK.

(35) Checking "pymongo" version by executing the command "python -c "import pymongo; print str(pymongo.version).strip().replace('+','')""...
RESULT: 2.8 >= 2.5 OK.

(36) Checking "pylibvirt" version by executing the command "python -c "import libvirt; print str(libvirt.getVersion()).strip()""...
RESULT: 1002002 >= 9003 OK.

(37) Checking "pypureomapi" version by executing the command "python -c "import pypureomapi; print str(pypureomapi.__version__).strip()""...
RESULT: 0.3 >= 0.3 OK.

(38) Checking "pyhtml" version by executing the command "python -c "import HTML; print str(HTML.__version__).strip()""...
RESULT: 0.04 >= 0.04 OK.

(39) Checking "gmetad-python" version by executing the command "ls -la /home/ubuntu/osgcloud/cbtool/3rd_party/monitor-core/gmetad-python/gmetad.py"...
RESULT: ANY >= ANY OK.

(40) Checking "bootstrap" version by executing the command "ls -la /home/ubuntu/osgcloud/cbtool/3rd_party/bootstrap/package.json"...
RESULT: ANY >= ANY OK.

(41) Checking "bootstrap-wizard" version by executing the command "ls -la /home/ubuntu/osgcloud/cbtool/3rd_party/Bootstrap-Wizard/README.md"...
RESULT: ANY >= ANY OK.

(42) Checking "streamprox" version by executing the command "ls -la /home/ubuntu/osgcloud/cbtool/3rd_party/StreamProx/README.md"...
RESULT: ANY >= ANY OK.

(43) Checking "d3" version by executing the command "ls -la /home/ubuntu/osgcloud/cbtool/3rd_party/d3/component.json"...
RESULT: ANY >= ANY OK.

(44) Checking "novaclient" version by executing the command "python -c "import novaclient; from novaclient.v1_1 import client""...
RESULT: ANY >= ANY OK.

(45) Checking "softlayer" version by executing the command "python -c "import SoftLayer; print "SoftLayer.__version__".replace('v','')""...
RESULT: 3.3.1 >= 3.1 OK.

(47) Checking "boto" version by executing the command "python -c "import boto; print str(boto.__version__).strip().replace('-dev','')""...
RESULT: 2.36.0 >= 2.1.8 OK.

(48) Checking "libcloud" version by executing the command "python -c "import libcloud; print str(libcloud.__version__).replace('-dev','').strip()""...
RESULT: 0.16.0 >= 0.11.0 OK.

(50) Checking "R" version by executing the command "R --version | grep version | grep -v GNU"...
RESULT: 3.0.220130925 >= 2.1 OK.

(49) Checking "iptables" version by executing the command "iptables -v 2>&1 | grep v | cut -d ' ' -f 2 | sed 's/v//g' | sed 's/://g'"...
RESULT: 1.4.21 >= 1.2 OK.

(51) Checking "sshkey" version by executing the command "ls /home/ubuntu/osgcloud/cbtool/credentials//cbtool_rsa"...
RESULT: ANY >= ANY OK.

(52) Checking "sshd" version by executing the command "sudo cat /etc/ssh/sshd_config | grep -v ^# | grep UseDNS | grep no"...
RESULT: NOT OK.
ACTION:  Please install/configure "sshd" by issuing the following command: "sed -i 's/.*UseDNS.*/UseDNS no/g' /etc/ssh/sshd_config; sed -i 's/.*GSSAPIAuthentication.*/GSSAPIAuthentication no/g' /etc/ssh/sshd_config;"

(52) Installing "sshd" by executing the command "sed -i 's/.*UseDNS.*/UseDNS no/g' /etc/ssh/sshd_config; sed -i 's/.*GSSAPIAuthentication.*/GSSAPIAuthentication no/g' /etc/ssh/sshd_config;"...
RESULT: DONE OK.

All dependencies are in place
Checking for a "private" configuration file for user "root" in /home/ubuntu/osgcloud/cbtool//configs/root_cloud_definitions.txt)
Copying /home/ubuntu/osgcloud/cbtool//configs/cloud_definitions.txt to /home/ubuntu/osgcloud/cbtool//configs/root_cloud_definitions.txt...
Please re-run configure again
Check if your redis server is running by running the following command:
sudo netstat -tulpn | grep 6379
tcp        0      0 127.0.0.1:6379          0.0.0.0:*               LISTEN      11701/redis-server
Even if redis is listening on 127.0.0.1, it is recommended to restart it:
sudo service redis-server restart
Then, lets start CBTOOL:
cd /home/ubuntu/osgcloud/cbtool
./cb --soft_reset
You should see an output like this:
ubuntu@cbtool-spec:~/osgcloud/cbtool$ ./cb --soft_reset
Cbtool version is "7b33da7"
Parsing "cloud definitions" file..... "/home/ubuntu/osgcloud/cbtool/lib/auxiliary//../..//configs/cloud_definitions.txt" opened and parsed successfully.
Checking "Object Store".....An Object Store of the kind "Redis" (shared) on node 9.47.240.196, TCP port 6379, database id "0" seems to be running.
Checking "Log Store".....A Log Store of the kind "rsyslog" (private) on node 9.47.240.196, UDP port 5114 seems to be running.
Checking "Metric Store".....A Metric Store of the kind "MongoDB" (shared) on node 9.47.240.196, TCP port 27017, database id "metrics" seems to be running.
Executing "hard" reset: (killing all running toolkit processes and flushing stores) before starting the experiment......
Killing all processes... done
Flushing Object Store... done
Flushing Metric Store... done
Flushing Log Store... done
Checking for a running API service daemon.....API Service daemon was successfully started. The process id is 21498 (http://9.47.240.196:7070).
Checking for a running GUI service daemon.....GUI Service daemon was successfully started. The process id is 21522, listening on port 8080. Full url is "http://9.47.240.196:8080".
The "sim" cloud named "MYSIMCLOUD" was successfully attached to this experiment.
The experiment identifier is EXP-02-03-2015-07-08-02-PM-UTC

 status: VMC 1D4C79C0-E126-5680-B375-0C6DC0BD60B1 was successfully registered on SimCloud "MYSIMCLOUD".
 status: VMC EAEBC719-8DD7-523D-948C-644640C2C9F0 was successfully registered on SimCloud "MYSIMCLOUD".
 status: VMC FBEB4F2B-AAF9-58FA-A23A-D68FC8F161E7 was successfully registered on SimCloud "MYSIMCLOUD".
 status: VMC A75CBDB2-5541-5478-8227-B74BA9ABC862 was successfully registered on SimCloud "MYSIMCLOUD".
 status: Attribute "collect_from_host" was set to "false". Skipping Host OS performance monitor daemon startup
All VMCs successfully attached to this experiment.
(MYSIMCLOUD)
Follow the instructions on Running Benchmark with a Simulated Cloud page to run a ‘simulated mode’ of the benchmark. The details of the ‘simulated mode’ are also described in that page.
Check the version of the mongo installed. The SPEC Cloud IaaS 2016 Benchmark kit does not ship with the mongo server. It is installed as part of CBTOOL installation. The following mongo versions have been tested with CBTOOL shipped in the kit:
$mongo --version
MongoDB shell version: 2.4.9
Check the redis version installed. CBTOOL shipped with the benchmark has been tested with the following redis versions:
$redis-server -v
Redis server v=2.8.4
If during subsequent installation of the benchmark, a new redis version is found not to work, the tester should install redis with the above version.
- Check python package versions. The following commands are helpful. These commands assume connectivity to Ubuntu and Python repositories.
Install Python package manager, namely, pip:
sudo apt-get install python-pipList python packages:
sudo pip listInstall a python package:
sudo pip install PYTONPACKAGEInstall a python package with a version:
sudo pip install PYTHONPACKAGE==0.1Remove a python package:
sudo pip uninstall PYTHONPACKAGEThe pip packages installed on the benchmark harness machine and their version should resemble this list:
apache-libcloud (0.17.0)
apt-xapian-index (0.45)
Babel (1.3)
backports.ssl-match-hostname (3.4.0.2)
Beaker (1.6.3)
boto (2.38.0)
chardet (2.0.1)
click (4.0)
cliff (1.12.0)
cmd2 (0.6.8)
colorama (0.2.5)
docutils (0.12)
HTML.py (0.4)
html5lib (0.999)
iso8601 (0.1.10)
libvirt-python (1.2.2)
lockfile (0.8)
msgpack-python (0.4.6)
netaddr (0.7.14)
netifaces (0.10.4)
oslo.config (1.11.0)
oslo.i18n (1.6.0)
oslo.serialization (1.5.0)
oslo.utils (1.5.0)
PAM (0.4.2)
pbr (0.11.0)
pip (7.1.2)
prettytable (0.7.2)
pssh (2.2.2)
pycrypto (2.6.1)
pymongo (2.7.2)
pyOpenSSL (0.13)
pyparsing (2.0.3)
pypureomapi (0.3)
pyserial (2.6)
python-apt (0.9.3.5ubuntu1)
python-daemon (1.5.5)
python-debian (0.1.21-nmu2ubuntu2)
python-keystoneclient (1.4.0)
python-neutronclient (2.5.0)
python-novaclient (2.25.0)
pytz (2015.4)
PyYAML (3.11)
redis (2.10.3)
requests (2.7.0)
ruamel.base (1.0.0)
ruamel.ordereddict (0.4.9)
ruamel.yaml (0.10.7)
setuptools (3.3)
simplejson (3.6.5)
six (1.9.0)
SoftLayer (4.0.2)
ssh-import-id (3.21)
stevedore (1.4.0)
Twisted-Core (13.2.0)
Twisted-Web (13.2.0)
urllib3 (1.7.1)
WebOb (1.3.1)
wheel (0.24.0)
zope.interface (4.0.5)
Preparing a Google Compute Engine Benchmark Harness Image (CBTOOL and Benchmark Drivers)
The instructions are similar to creating a VM on OpenStack or Amazon EC2, installing CloudBench and benchmark drivers.
Preparing a Digital Ocean Benchmark Harness Image (CBTOOL and Benchmark Drivers)
The instructions are similar to creating a VM on OpenStack or Amazon EC2, installing CloudBench and benchmark drivers.
Configuring CBTOOL For Your OpenStack Cloud
The instructions below describe how to configure CBTOOL running on benchmark harness machine for your OpenStack cloud. These instructions assume that CBTOOL image has been created with Ubuntu Trusty distribution. The Linux username of the image is ubuntu.
If an OpenStack cloud has different public and private API endpoints, please ensure that CBTOOL running on the benchmark harness machine is able to reach both public and private endpoints directly or through a jump box. Otherwise, CBTOOL will not be able to run experiments.
These instructions also assume that a network and virtual routers have been configured in the OpenStack cloud. The benchmark harness machine running CBTOOL must be able to reach the instances. For initial testing, it is recommended that a ‘Flat’ network is configured in the OpenStack cloud. If the instances will have both a private and a public IP address, the floating IP address that is reachable from CBTOOL machine must be automatically assigned to the instances upon instance creation.
For testing the benchmark, the benchmark harness machine running CBTOOL can be set up in the same network as instances.
Get the spec_key file from kit into cbtool credentials directory. It is recommended that to create a new set of ssh keys to copy into cbtool credentials directory.:
cp /home/ubuntu/osgcloud/spec_ssh_keys/* /home/ubuntu/osgcloud/cbtool/credentials/
Add hostname of OpenStack controller in your /etc/hostsfile:
sudo vi /etc/hosts
IPADDROSCONTROLLER    HOSTNAMEOSCONTROLLER
If your Linux username used to log into VM was ubuntu, a file, namely, ubuntu_cloud_definitions.txt must be present. Make edits into this file for configuring it to talk to OpenStack cloud. If the file does not exist, rerun the CBTOOL installation.:
cd /home/ubuntu/osgcloud/cbtool/configs
ls
cloud_definitions.txt  ubuntu_cloud_definitions.txt  templates
Edit that file:
vi ubuntu_cloud_definitions.txtand replace the section under CLOUDOPTION_MYOPENSTACK with the following. Make sure to:
- Configure the IP address of your OpenStack controller (public endpoint) in
- OSK_ACCESS parameter.
2. Replace RegionOne with appropriate name for region configured in OpenStack cloud for the OSK_INITIAL_VMCS parameter. 3. Replace public with the network name in the OSK_NETNAME parameter to which instances in your cloud will be configured with. The network and virtual routers if any must be preconfigured in the OpenStack cloud. 4. The OSK_KEY_NAME is the name of the (public) key that will be “injected” on an image before it is booted. For instance, in OpenStack, the key is normally injected in /root/.ssh/authorized_keys, allowing a user to login on a VM after the boot as root. This attribute refers to a key that is managed directly by the OpenStack cloud. On other hand, OSK_SSH_KEY_NAME is the name of the key used to login on a VM as the user (non-root) specified by OSK_LOGIN. This key will not (necessarily) be injected on the image. It is expected that the key and username specified by OSK_SSH_KEY_NAME and OSK_LOGIN are pre-defined on the VM. These attributes are not managed (or known at all) by the OpenStack cloud.:
         [USER-DEFINED : CLOUDOPTION_MYOPENSTACK]
         OSK_ACCESS = http://PUBLICIP:5000/v2.0/                   # Address of controlled node (where nova-api runs)
         OSK_CREDENTIALS =  admin-admin-admin                      # user-tenant-password
         OSK_SECURITY_GROUPS = default                             # Make sure that this group exists first
         OSK_INITIAL_VMCS = RegionOne                              # Change "RegionOne" accordingly
         OSK_LOGIN = cbuser                                        # The username that logins on the VMs
         OSK_KEY_NAME = spec_key                                   # SSH key for logging into workload VMs
         OSK_SSH_KEY_NAME = spec_key                               # SSH key for logging into workload VMs
         OSK_NETNAME = public

Change :bash:`STARTUP_CLOUD` to :bash:`MYOPENSTACK` in :bash:`ubuntu_cloud_definitions.txt`.


If your cloud supports HTTPS, enter :bash:`OSK_ACCESS` as::

     OSK_ACCESS = https://PUBLICIP/v2.0/ (or the keystone URL)
Floating IPs. If your cloud needs floating IP addresses, set the following in the cloud configuration file after the OpenStack configuration set above:
[VM_DEFAULTS]
USE_FLOATING_IP = $True
Start CBTOOL:
cd /home/ubuntu/osgcloud/cbtool
./cb --soft_reset
The successful output will be similar to the following:
Cbtool version is "7b33da7"
Parsing "cloud definitions" file..... "/home/ubuntu/osgcloud/cbtool/lib/auxiliary//../..//configs/ubuntu_cloud_definitions.txt" opened and parsed successfully.
Checking "Object Store".....An Object Store of the kind "Redis" (shared) on node 9.47.240.202, TCP port 6379, database id "0" seems to be running.
Checking "Log Store".....A Log Store of the kind "rsyslog" (private) on node 9.47.240.202, UDP port 5114 seems to be running.
Checking "Metric Store".....A Metric Store of the kind "MongoDB" (shared) on node 9.47.240.202, TCP port 27017, database id "metrics" seems to be running.
Executing "hard" reset: (killing all running toolkit processes and flushing stores) before starting the experiment......
Killing all processes... done
Flushing Object Store... done
Flushing Metric Store... done
Flushing Log Store... done
Checking for a running API service daemon.....API Service daemon was successfully started. The process id is 16020 (http://9.47.240.202:7070).
Checking for a running GUI service daemon.....GUI Service daemon was successfully started. The process id is 16044, listening on port 8080. Full url is "http://9.47.240.202:8080".
 status: Checking if the ssh key pair "spec_ssh" is created on VMC RegionOne....
 status: Checking if the security group "default" is created on VMC RegionOne....
 status: Checking if the network "public" can be found on VMC RegionOne...
 status: Checking if the imageids associated to each "VM role" are registered on VMC RegionOne....
 status: WARNING Image id for VM roles "giraphmaster,giraphslave": "cb_giraph" is NOT registered (attaching VMs with any of these roles will result in error).
         WARNING Image id for VM roles "mongos,redis,mongo_cfg_server,mongodb": "cb_ycsb" is NOT registered (attaching VMs with any of these roles will result in error).
         WARNING Image id for VM roles "coremark,driver_coremark": "cb_coremark" is NOT registered (attaching VMs with any of these roles will result in error).
         WARNING Image id for VM roles "specjbb": "cb_specjbb" is NOT registered (attaching VMs with any of these roles will result in error).
         WARNING Image id for VM roles "driver_netperf,hadoopslave,hadoopmaster,driver_hadoop": "cb_hadoop" is NOT registered (attaching VMs with any of these roles will result in error).
         WARNING Image id for VM roles "filebench,driver_filebench": "cb_filebench" is NOT registered (attaching VMs with any of these roles will result in error).
         WARNING Image id for VM roles "tinyvm": "cb_nullworkload" is NOT registered (attaching VMs with any of these roles will result in error).
         WARNING Image id for VM roles "windows,client_windows": "cb_windows" is NOT registered (attaching VMs with any of these roles will result in error).
         WARNING Image id for VM roles "ddgen": "cb_ddgen" is NOT registered (attaching VMs with any of these roles will result in error).
         WARNING Image id for VM roles "driver_tradelite,client_tradelite": "cb_tradelite" is NOT registered (attaching VMs with any of these roles will result in error).
         WARNING Image id for VM roles "iperfserver,iperfclient": "cb_iperf" is NOT registered (attaching VMs with any of these roles will result in error).
         WARNING Image id for VM roles "cn_hpc,fen_hpc": "cb_hpcc" is NOT registered (attaching VMs with any of these roles will result in error).
         WARNING Image id for VM roles "lb,db2,driver_daytrader,geronimo,mysql,client_daytrader,was": "cb_daytrader" is NOT registered (attaching VMs with any of these roles will result in error).
         WARNING Image id for VM roles "netserver,netclient": "cb_netperf" is NOT registered (attaching VMs with any of these roles will result in error).
         WARNING Image id for VM roles "fioclient,fioserver,driver_fio": "cb_fio" is NOT registered (attaching VMs with any of these roles will result in error)
 status: VMC "RegionOne" was successfully tested.
The "osk" cloud named "MYOPENSTACK" was successfully attached to this experiment.
The experiment identifier is EXP-02-04-2015-04-55-50-PM-UTC

 status: Removing all VMs previously created on VMC "RegionOne" (only VM names starting with "cb-ubuntu-MYOPENSTACK").....
 status: Removing all VVs previously created on VMC "RegionOne" (only VV names starting with "cb-ubuntu-MYOPENSTACK").....
 status: The host list for VMC "RegionOne" is empty ("discover_hosts" was set to "false"). Skipping Host OS performance monitor daemon startup
 status: Attribute "collect_from_host" was set to "false". Skipping Host OS performance monitor daemon startup
All VMCs successfully attached to this experiment.
(MYOPENSTACK)
Here is an example of an unsuccessful output:
status: VMC "default" did not pass the connection test." : OpenStack connection failure: ('Connection aborted.', BadStatusLine("''",))
The "osk" cloud named "MYOPENSTACK" could not be attached to this experiment: VMC "default" did not pass the connection test." : OpenStack connection failure: ('Connection aborted.', BadStatusLine("''",))
Usage: vmcattach <cloud_name> <identifier> [temp_attr_list = empty=empty] [mode]
()
5. The cloud name must also be entered in osgcloud_rules.yaml file. If the instructions were followed, the file should be in:
cd ~/osgcloud/driver
Configuring CBTOOL For Amazon Elastic Compute Cloud
Below we describe instructions to connect to Amazon Elastic Compute Cloud (EC2). These instructions assume that the tester connects to EC2 similar to how a cloud consumer would normally do.
Connecting to EC2 requires AWS access key id, the name of current security group, and AWS secret access key. The AWS access and the AWS secret access key can be obtained from the security dashboard on AWS.
If the Linux username used to log into VM was ubuntu, a file, namely, ubuntu_cloud_definitions.txt must be present. Make edits into this file for configuring it to talk to OpenStack cloud. If the file does not exist, rerun the CBTOOL installation.:
cd /home/ubuntu/osgcloud/configs
ls
cloud_definitions.txt  ubuntu_cloud_definitions.txt  templates
Edit that file:
vi cloud_definitions.txtand replace the section under CLOUDOPTION_MYAMAZON with the following.:
[USER-DEFINED : CLOUDOPTION_MYAMAZON]

EC2_ACCESS = AKIAJ36T4WERTSWEUQIA                          # This is the AWS access key id
EC2_SECURITY_GROUPS = mWeb                                 # Make sure that this group exists first
EC2_CREDENTIALS = GX/idfgw/GqjVeUl9PzWeIOIwpFhAyAOdq0v1C1R # This is the AWS secret access key
EC2_KEY_NAME = YOURSSHKEY                                          # Make sure that this key exists first
EC2_INITIAL_VMCS = us-west-2:sut                           # Change "us-east-1" accordingly
EC2_SSH_KEY_NAME = cbtool_rsa                                  # SSH key for logging into workload VMs
EC2_LOGIN = ubuntu                                         # The username that logins on the VMs
Change STARTUP_CLOUD to MYAMAZON in ubuntu_cloud_definitions.txt.
Start CBTOOL:
cd /home/ubuntu/osgcloud/cbtool
The successful output looks like:
ubuntu@cbtool-new:~/osgcloud/cbtool$ sudo ./cb --soft_reset

Cbtool version is "7b33da7"
Parsing "cloud definitions" file..... "/home/ubuntu/osgcloud/cbtool/lib/auxiliary//../..//configs/cloud_definitions.txt" opened and parsed successfully.
Checking "Object Store".....An Object Store of the kind "Redis" (shared) on node 172.30.0.172, TCP port 6379, database id "0" seems to be running.
Checking "Log Store".....A Log Store of the kind "rsyslog" (private) on node 172.30.0.172, UDP port 5114 seems to be running.
Checking "Metric Store".....A Metric Store of the kind "MongoDB" (shared) on node 172.30.0.172, TCP port 27017, database id "metrics" seems to be running.
Executing "hard" reset: (killing all running toolkit processes and flushing stores) before starting the experiment......
Killing all processes... done
Flushing Object Store... done
Flushing Metric Store... done
Flushing Log Store... done
Checking for a running API service daemon.....API Service daemon was successfully started. The process id is 1686 (http://172.30.0.172:7070).
Checking for a running GUI service daemon.....GUI Service daemon was successfully started. The process id is 1710, listening on port 8080. Full url is "http://172.30.0.172:8080".
 status: Checking if the ssh key pair "mW" is created on VMC us-west-2....
 status: Checking if the security group "mWeb" is created on VMC us-west-2....
 status: Checking if the imageids associated to each "VM role" are registered on VMC us-west-2....
 status: VMC "us-west-2" was successfully tested.
The "ec2" cloud named "MYAMAZON" was successfully attached to this experiment.
The experiment identifier is EXP-02-17-2015-09-59-09-PM-UTC

 status: Removing all VMs previously created on VMC "us-west-2" (only VMs names starting with "cb-root-MYAMAZON").....
 status: The host list for VMC "us-west-2" is empty ("discover_hosts" was set to "false"). Skipping Host OS performance monitor daemon startup
 status: Attribute "collect_from_host" was set to "false". Skipping Host OS performance monitor daemon startup
All VMCs successfully attached to this experiment.
(MYAMAZON)
The cloud name must also be entered in osgcloud_rules.yaml file. If the instructions were followed, the file should be in:
cd ~/osgcloud/driver
Configuring CBTOOL For Google Compute Engine
Below we describe instructions to connect to Google Compute Engine (GCE) cloud. These instructions assume that the tester connects to GCE in a manner similar to how a cloud consumer would normally connect.
Connecting to GCE requires you to configure authentication for the “gcloud” CLI on the CBTOOL Orchestrator node. The pieces of information required on this process are basically the ID (not project name or number) for two “projects” ( a GCE-spefic term): one that contains the pre-created images for different workloads (which requires “view-only” access to the user) and one where the actual instances will be launched. Almost needless to say, they can be the same.
- Configuring gcloud CLI authentication
- All gcloud-related binaries are already present on the node, installed during the image preparation.
- Execute gcloud auth login --no-launch-browser. This command will output an URL that has to be accessed from a browser. It will produce an authentication string that has to be pasted back on the command’s prompt.
- Execute gcloud config set project YOUR-PROJECT-ID, where YOUR-PROJECT-ID is the ID of the project.
- Test the success of the configuration authentication by running a command such as gcloud compute machine-types list.
2. If the Linux username used to log into VM was ubuntu, a file, namely, ubuntu_cloud_definitions.txt must be present. Make edits into this file for configuring it to talk to OpenStack cloud. If the file does not exist, rerun the
CBTOOL installation.:
cd /home/ubuntu/osgcloud/configs
ls
cloud_definitions.txt  ubuntu_cloud_definitions.txt  templates
Edit that file:
vi cloud_definitions.txtand replace the section under CLOUDOPTION_MYGCE with the following.:
[USER-DEFINED : CLOUDOPTION_MYGCE ]

GCE_ACCESS = project_name_for_images,project_name_for_instances  # Obtained with "gcloud info".
GCE_SECURITY_GROUPS = cloudbench                           # Currently, not used
GCE_CREDENTIALS = ABCDEFGHIJKLMNOPQRSTUVXYWZ01234567890-+* # Currently, not used
GCE_INITIAL_VMCS = us-east1-b:sut                          # Change "us-east1-b" accordingly
GCE_LOGIN = cbuser
Change STARTUP_CLOUD to MYGCE in ubuntu_cloud_definitions.txt
Start CBTOOL:
cd /home/ubuntu/osgcloud/cbtool
The successful output looks like:
ubuntu@cbtool-new:~/osgcloud/cbtool$ sudo ./cb --soft_reset

Cbtool version is "7b33da7"
Parsing "cloud definitions" file..... "/home/ubuntu/osgcloud/cbtool/lib/auxiliary//../..//configs/cloud_definitions.txt" opened and parsed successfully.
Checking "Object Store".....An Object Store of the kind "Redis" (shared) on node 172.30.0.172, TCP port 6379, database id "0" seems to be running.
Checking "Log Store".....A Log Store of the kind "rsyslog" (private) on node 172.30.0.172, UDP port 5114 seems to be running.
Checking "Metric Store".....A Metric Store of the kind "MongoDB" (shared) on node 172.30.0.172, TCP port 27017, database id "metrics" seems to be running.
Executing "hard" reset: (killing all running toolkit processes and flushing stores) before starting the experiment......
Killing all processes... done
Flushing Object Store... done
Flushing Metric Store... done
Flushing Log Store... done
Checking for a running API service daemon.....API Service daemon was successfully started. The process id is 1686 (http://172.30.0.172:7070).
Checking for a running GUI service daemon.....GUI Service daemon was successfully started. The process id is 1710, listening on port 8080. Full url is "http://172.30.0.172:8080".
status: VPN configuration for this cloud already generated: /home/cbuser/cbtool/lib/auxiliary//../../configs/generated/MYGCE_server-cb-openvpn.conf
status: Checking if the ssh key pair "cbtool_rsa" is created on VMC us-east1-b....
status: Checking if the imageids associated to each "VM role" are registered on VMC us-east1-b (project level-lyceum-113918)....
status: VMC "us-east1-b" was successfully tested.

The "gce" cloud named "MYGCE" was successfully attached to this experiment.
The experiment identifier is EXP-01-05-2016-12-01-37-AM-UTC

status: Removing all VMs previously created on VMC "us-east1-b" (only VMs names starting with "cb-cbuser-MYGCE").....
status: The host list for VMC "us-east1-b" is empty ("discover_hosts" was set to "false"). Skipping Host OS performance monitor daemon startup
status: Attribute "collect_from_host" was set to "false". Skipping Host OS performance monitor daemon startup
All VMCs successfully attached to this experiment.
(MYGCE)
The cloud name must also be entered in osgcloud_rules.yaml file. If the instructions were followed, the file should be in:
cd ~/osgcloud/driver
Configuring CBTOOL For Digital Ocean
Below we describe instructions to connect to DigitalOcean. These instructions assume that the tester connects to DigitalOcean similar to how a cloud consumer would normally do.
Connecting to DigitalOcean requires an Access token, and SSH key IDs, both can be obtained by going to http://cloud.digitalocean.com and clicking on “API”.
If the Linux username used to log into VM was ubuntu, a file, namely, ubuntu_cloud_definitions.txt must be present. Make edits into this file for configuring it to talk to DigitalOcean. If the file does not exist, rerun the CBTOOL installation.:
cd /home/ubuntu/osgcloud/configs
ls
cloud_definitions.txt  ubuntu_cloud_definitions.txt  templates
Edit that file:
vi cloud_definitions.txtand update the relevant section variables of the file to include these values:
[USER-DEFINED]

[USER-DEFINED : CLOUDOPTION_MYDIGITALOCEAN ]
DO_INITIAL_VMCS = sfo1:sut                              # VMC == DO data center (we don't have availability zones yet)
DO_CREDENTIALS = tag:long_hexademical_string        # (your DigitalOcean access token) for http://api.digitalocean.com, where the tag can be arbitratry
DO_SSH_KEY_NAME = cbtool_rsa                            # Either upload credentials/cbtool_rsa.pub to DigitalOcean or tell us where your private key is via cloud-init
DO_KEY_NAME = name1:name2                           # Comma-separated list of names of your DigitalOcean ssh keys
There are currently 11 global DigitalOcean datacenters to choose from:
 +----------------------+----------------+
 | DigitalOcean Regions | API Identifier |
 +----------------------+----------------+
 | Amsterdam 1          | ams1           |
 | Bangalore 1          | blr1           |
 | San Francisco 1      | sfo1           |
 | San Francisco 2      | sfo2           |
 | Amsterdam 3          | ams3           |
 | Frankfurt 1          | fra1           |
 | London 1             | lon1           |
 | New York 1           | nyc1           |
 | New York 2           | nyc2           |
 | New York 3           | nyc3           |
 | San Francisco 1      | sfo1           |
 | Singapore 1          | sgp1           |
 | Toronto 1            | tor1           |
 +----------------------+----------------+

# OPTIONAL: If you have not already prepared your own images, DigitalOcean,
# maintains public images that "just work" alread. However, if you have prepared your
# images per our documentaiton, you would use them like this:
# These "imageids" are exactly the same names as the one in your DigitalOcean account:
[VM_TEMPLATES : CLOUDOPTION_MYDIGITALOCEAN ]
TINYVM = size:512mb, imageids:1, imageid1:name_of_snapshot_in_your_digitalocean_account
CASSANDRA = size:4gb, imageids:1, imageid1:name_of_snapshot_in_your_digitalocean_account
YCSB = size:4gb, imageids:1, imageid1:name_of_snapshot_in_your_digitalocean_account
SEED = size:4gb, imageids:1, imageid1:name_of_snapshot_in_your_digitalocean_account
HADOOPMASTER = size:4gb, imageids:1, imageid1:name_of_snapshot_in_your_digitalocean_account
HADOOPSLAVE = size:4gb, imageids:1, imageid1:name_of_snapshot_in_your_digitalocean_account

# OPTIONAL: It's very likely that your laptop/server hosting cbtool is not directly addressible
# by DigitalOcean, in which case you'll need to use VPN support:
# With the below configuration, cbtool will automatically bootstrap DigitalOcean virtual machines
# to join the VPN using cloud-config userdata so that your benchmark VMs and your laptop/server
# networks are reachable to each other. Application-specific traffic will remain inside the
# DigitalOcean cloud, not over the VPN.
# Refer to this link for more detailed information: https://github.com/ibmcb/cbtool/wiki/HOWTO:-Use-VPN-support-with-your-benchmarks

[VPN : CLOUDOPTION_MYDIGITALOCEAN ]
SERVER_IP = xxx.xxx.xxx.xxx # Address of a public OpenVPN server configured using the files from cbtool/configs/generated after a first-time cbtool run
SERVER_BOOTSTRAP = 10.9.0.6 # Just a guess. The tool will auto-correct this as your laptop's IP address changes.
NETWORK = 10.9.0.0 # the /16 or /24 network address with respect to the SERVER_BOOTSTRAP
SERVER_PORT = 1194

[VM_DEFAULTS : CLOUDOPTION_MYDIGITALOCEAN ]
USE_VPN_IP = $True
VPN_ONLY = $True
USERDATA = $True

Change STARTUP_CLOUD to MYDIGITALOCEAN in ubuntu_cloud_definitions.txt
Start CBTOOL:
cd /home/ubuntu/osgcloud/cbtoolThe successful output looks like:
ubuntu@cbtool-new:~/osgcloud/cbtool$ sudo ./cb -f


Cbtool version is "a46a761"
Parsing "cloud definitions" file..... "/home/mrhines/do/cbtool/lib/auxiliary//../..//configs/mrhines_cloud_definitions.txt" opened and parsed successfully.
Checking "Object Store".....An Object Store of the kind "Redis" (private) on node 192.168.1.123, TCP port 6379, database id "0" seems to be running.
Checking "Log Store".....A Log Store of the kind "rsyslog" (private) on node 192.168.1.123, UDP port 5114 seems to be running.
Checking "Metric Store".....A Metric Store of the kind "MongoDB" (shared) on node 192.168.1.123, TCP port 27017, database id "metrics" seems to be running.
Checking "File Store".....A File Store of the kind "rsync" (private) on node 192.168.1.123, TCP port 873 seems to be running.
Executing "soft" reset: (killing all running toolkit processes and flushing stores) before starting the experiment......
Killing all processes... done
Flushing Object Store... done
Flushing Log Store... done

Checking for a running API service daemon.....API Service daemon was successfully started. The process id is ['4008'] (http://192.168.1.123:7070).
Checking for a running GUI service daemon.....GUI Service daemon was successfully started. The process id is ['4038', '4039'], listening on port 8080. Full url is "http://192.168.1.123:8080".
 status:  The attribute "USE_VPN_IP" in Global Object [VM_DEFAULTS] is set to "True". Will set theattribute "START_SERVER" in the Global Object [VPN] also to "True".
 status: VPN configuration for this cloud already generated: /home/mrhines/do/cbtool/lib/auxiliary//../../configs/generated/MYDIGITALOCEAN_server-cb-openvpn.conf
Checking for a running VPN daemon.....VPN daemon was successfully started. The process id is ['4113'].
 status: Caching DigitalOcean Locations...
 status: Caching DigitalOcean Sizes...
 status: Caching DigitalOcean Images (can take a minute or so)...
The "do" cloud named "MYDIGITALOCEAN" was successfully attached to this experiment.
The experiment identifier is EXP-01-22-2016-03-22-39-PM-UTC

 status: Caching DigitalOcean Locations...
 status: Caching DigitalOcean Sizes...
 status: Caching DigitalOcean Images (can take a minute or so)...
 status: The host list for VMC "sfo1" is empty ("discover_hosts" was set to "false"). Skipping Host OS performance monitor daemon startup
 status: Attribute "collect_from_host" was set to "false". Skipping Host OS performance monitor daemon startup
All VMCs successfully attached to this experiment.
(MYDIGITALOCEAN)
The cloud name must also be entered in osgcloud_rules.yaml file. If the instructions were followed, the file should be in:
cd ~/osgcloud/driverMulti-tenancy: Currently, DigitalOcean has an API request limit of 5000 requests / hour. If you’re planning to create more than a couple hundred virtual machines, you will hit this limit very quickly. The only solution currently provided by SPEC-Cloud to get around this limit is to use more than one account at the same time. When using multi-tenancy, SPEC-Cloud will automatically round-robin assign virtual machines to all the accounts in the configuration file so that you don’t have to worry about the API limit. Adding adddtional accounts is as simple as appending a list of comma-separated values to the configuration file instead of one, like this:
[USER-DEFINED : CLOUDOPTION_MYDIGITALOCEAN ] DO_CREDENTIALS = tag:token1,tag2:token2,tag3:token3 # where the tag can be arbitratry
That’s it.
For digitalocean, we also recommend an “update_attempts” setting in osgcloud/driver/osgcloud_rules.yaml of 180.
Multiple Network Interfaces on Benchmark Harness Machine
If there are more than one network interfaces on the benchmark harness machine, it is best to configure CBTOOL with the network interface that is used to communicate with the cloud API.
Set the following configuration in the configuration file of cbtool, assuming it was set up on an Ubuntu machine with ubuntu as the Linux user:
vi ~/osgcloud/cbtool/configs/ubuntu_cloud_definitions.txt
MANAGER_IP = IPADDRESS_OF_INTERFACE_FOR_CLOUDAPI
Timezone and NTP server
It is highly recommended that the timezone configured on the benchmark harness machine is UTC. Set the timezone to UTC by running the following command:
sudo dpkg-reconfigure tzdata
Scroll to the bottom of the list and select “None of the above”. Then, select “UTC”.
It is also highly recommended that the timezone of benchmark harness machine and instances should be the same.
If, for a compliant run, an NTP server other than the benchmark harness machine is used, it must be manually configured on the benchmark harness machine.
Adding a New Cloud Adapter (native method)
As previously mentioned, CBTOOL’s layered architecture was intended to allow the framework to be incrementally expanded in a non-intrusive (i.e., minimal to no changes to the existing “core” code) and incremental manner.
While multiple Cloud Adapters are already available, new adapters are constantly added. These adapters can be divided in two broad classes, following the Cloud’s classification, white-box and black-box (i.e., public). It is recommended that, for the addition of a new cloud adapter, one uses either OpenStack (in case of white box) or EC2 (in case of black-box) as examples.
- Assuming that an adapter for a “New Public Cloud” (npc) will be written, here is
- the summarization of the required steps.
- Using ~/osgcloud/cbtool/configs/templates/_ec2.txt as an example, create ~/osgcloud/cbtool/configs/templates/_npc.txt:
- A simple cp ~/osgcloud/cbtool/configs/templates/_ec2.txt ~/osgcloud/cbtool/configs/templates/_npc.txt should be enough
- Using ~/osgcloud/cbtool/lib/clouds/ec2_cloud_ops.py as an example, create ~/osgcloud/cbtool/lib/clouds/npc_cloud_ops.py.
- Again, simply cp ~/cbtool/lib/clouds/ec2_cloud_ops.py ~/osgcloud/cbtool/lib/clouds/npc_cloud_ops.py
- Open the file ~/osgcloud/cbtool/lib/clouds/npc_cloud_ops.py and start by changing lines 37-38 (import New Public Cloud’s native python client) and line 40 (rename Ec2Cmds into NpcCmds)
3. CBTOOL’s abstract operations are mapped to five mandatory methods in the (newly created by the implementer) class NpcCmds:
- vmccleanup
- vmcregister
- vmcunregister
- vmcreate
- vmdestory
4. In addition to the mandatory mapping methods, the following methods are also part of each Cloud adapter:
- test_vmc_connection
- is_vm_running
- is_vm_ready
5. From a cloud native python client standpoint, an implementer needs determine how to:
- connect to the cloud
- list images
- list SSH keys
- list security groups (if applicable)
- list networks (if applicable)
- list instances
- get all relevant information about instances (e.g., state, IP addresses)
6. The parameters in _npc.txt will have to be changed taking into account specific features on this cloud.
7. In addition to the “mandatory” methods one might opt for (as shown in the aforementioned table of already existing Cloud Adapters) to implement “optional” operations, such as “vmcapture” and “vmrunstate” (both additional methods in the same class).
- It is also possible to add the ability for persistent storage attachment and
detachment (i.e., “virtual volumes”) through the methods “vvcreate” and “vvdestroy”.
8. These optional methods will require, from cloud native python client, understanding on how to:
- create an “image” from an “instance”
- alter the instance power state (e.g., suspend, resume, power on/off) and list
- get information and attach/detach volumes from instances
9. Finally, it is important to remember that the parameters in _npc.txt will have to be changed taking into account specific features on this cloud.
10. The recommended way to test the new adapter is to start with a simple “cldattach npc TESTNPCCLOUD”, followed by “vmcattach all”, directly on CBTOOL’s CLI.
- This operation will ensure that vmccleanup and vmcregister methods are properly implemented.
11. At this point, the implementer should prepare an image on the New Public Cloud.
12. After that, the implementer can continue by issuing vmattach and vmdetach directives on the CLI.
Adding a New Cloud Adapter (simplified libcloud method)
CBTOOL provides a more simplified method of getting up and running with your favorite cloud via Apache libcloud. As of this writing (mid-2016), we have provided an easy-to-use class hierarchy in python that any new cloud can extend with very few lines of code to easily bring a new libcloud-support cloud (of which there are many) into the benchmark. The complete list of libcloud-supported clouds is vast: https://libcloud.readthedocs.io/en/latest/supported_providers.html
As of now, our simplified libcloud-based method includes support for the following libcloud-based functions: 1. create/destroy VMs 2. multi-tenancy (using multiple accounts at the same time) 3. create/destroy block storage volumes 4. multi-region support 5. cloud-init support for both SSH-keys and OpenVPN.
The things that our simplified libcloud-support can NOT do include: 1. floating IP addresses 2. image snapshot management 3. block storage snapshot management 4. other esoteric functions provided by individual libcloud-based cloud providers.
For example, if you have some “special” feature supported by your cloud which is not standard, such as, docker-specific commands, or auto-configuration of a secret feature that only your cloud knows about, then the simplified libcloud-approach is not for you. You will want to go with the ‘native’ approach above.
As long as you’re in the first list, you can use this simplified approach.
- Using ~/osgcloud/cbtool/configs/templates/_digitalocean.txt as an example, create ~/osgcloud/cbtool/configs/templates/_npc.txt:
- A simple cp ~/osgcloud/cbtool/configs/templates/_digitalocean.txt ~/osgcloud/cbtool/configs/templates/_npc.txt should be enough.
- Using ~/osgcloud/cbtool/lib/clouds/do_cloud_ops.py as an example, create ~/osgcloud/cbtool/lib/clouds/npc_cloud_ops.py.
- Again, simply cp ~/cbtool/lib/clouds/do_cloud_ops.py ~/osgcloud/cbtool/lib/clouds/do_cloud_ops.py should be sufficient.
3. Read the documentation in the __init__ function at the beginning of the file ~/osgcloud/cbtool/lib/clouds/libcloud_common.py. Edit your own file ~/osgcloud/cbtool/lib/clouds/npc_cloud_ops.py and adapt the options to the __init__ function to match the features supported by your libcloud-based cloud. For example, if you don’t need SSH keys via cloud-init, or you don’t support cloud-init at all, then set those respective options to False. Most options are optional. While the DigitalOcean adapter makes more complete use of all the libcloud features, your cloud may not need them all.
3. In the pre_create_vm function, this is where you would add any additional overrides to the function which actually launches VMs to your cloud. Many clouds provide special python keyword arguments to the libcloud create_node() function which are special to your individual cloud. If this is true, then add the respective keyword arguments to the pre_create_vm function. See the example used in the DigitalOcean adapter for such an override: ~/osgcloud/cbtool/lib/clouds/do_cloud_ops.py
Once you are done, you should have a very short cloud adapter. If you are running into trouble adding the new adapter, we will be more than happy to help you on the mailing lists. Join the lists and let us know how it goes.
How Provisioning Scripts are Executed
CBTOOL decides which (and how many) instances to create, based on the “Application Instance” (AI) template. For an AI of type “Hadoop” there will be five instances with the role hadoopslave and one with role hadoopmaster. For a “Cassandra YCSB” AI, there will be five instances with the role seed (all seed nodes) and one instance with the role ycsb. The CBTOOL orchestrator node composes the list of instance creation requests into cloud-specific API calls (or commands) and issues these to the cloud under test. It then waits for the instances to complete fully boot, and collect all relevant IP addresses.
After the instances are booted, the orchestrator node, again following the AI template logins on each instance through ssh, and configures the applications by executing scripts specific to each instance role. Taking a Cassandra YCSB as an example, it executes (in parallel) scripts to form a Cassandra cluster on all five instances with the seed role, and a different script to configure YCSB on the instance that will generate load. After the actual Application Instance is fully deployed (i.e., the Cassandra or Hadoop clusters are fully formed, and the load generating application clients are fully configured) the orchestrator node starts the process designated Load Manager (LM) in one of the instances of the AI.
The activities described in the two previous paragraphs are represented in the following picture.
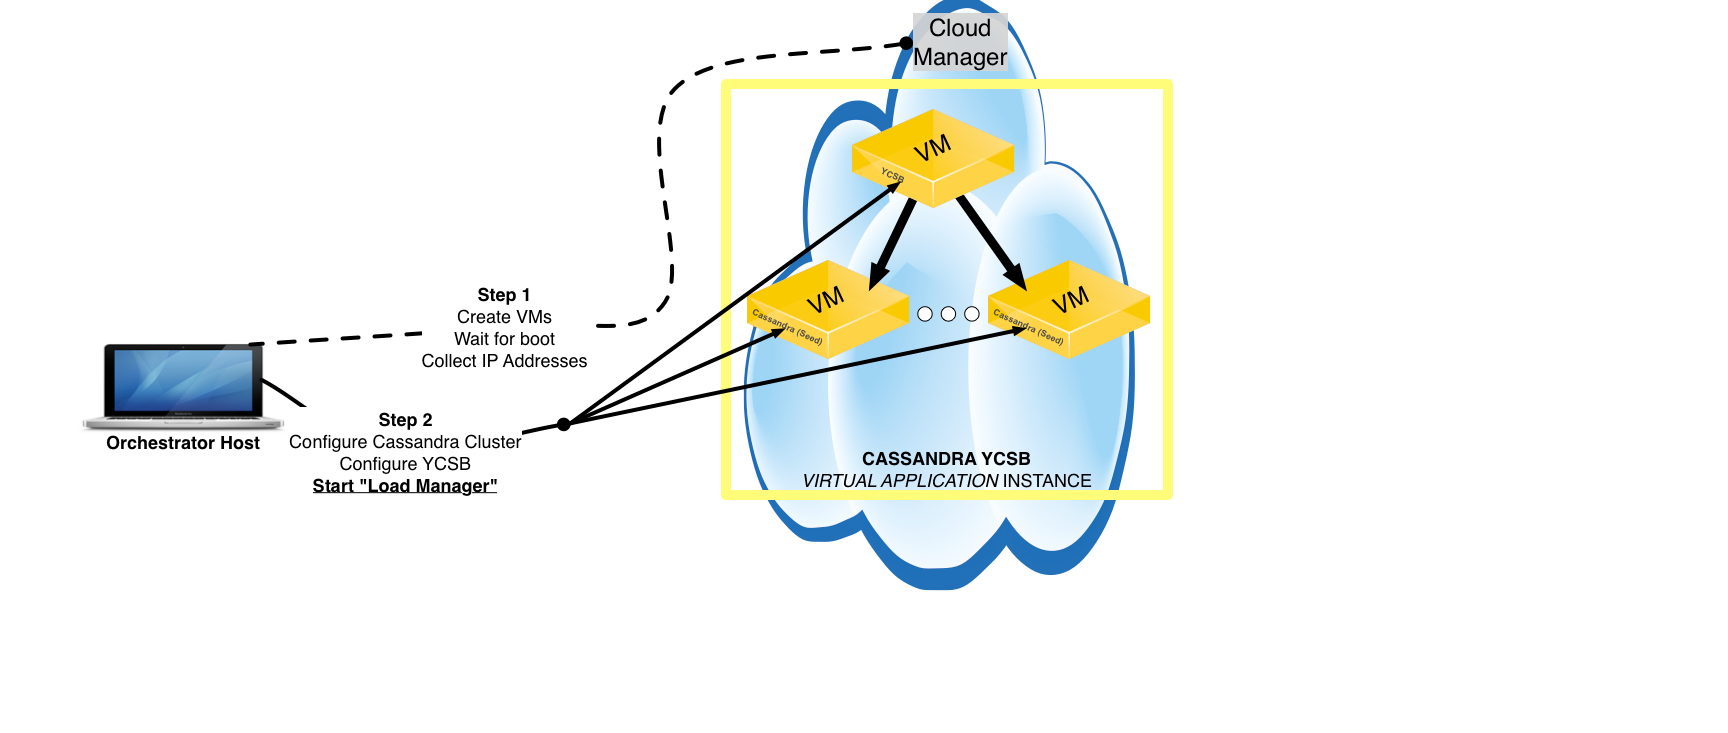
Once the LM is started, the whole Application Instance becomes self-sufficient, i.e., the Orchestrator node is not required to start any connections to any of the instances that composes the AI throughout the rest of the experiment. The LM will contact the Object Store (typically residing on the Orchestrator node), obtaining all relevant information about load profile, load duration and load level (i.e., intensity) and will execute a load generating process through a script also specified on the AI template.
The Load Manager will wait until the process ends, collects all information from either the process’ standard output or an output file, and will then process the results and submits a new sample containing application performance results. These results are written, in the form of time-series with multiple key-value pairs (some applications report multiple metrics such are read and write throughput, read and write latency, etc.) in CBTOOL’s Metric Store. While the layered architecture of CBTOOL allows the use of multiple data stores for this purpose, the only implementation currently available is MongoDB.
The continuous execution/results collection is depicted in the figure below.

Cloud Configuration Gathering Scripts Through Cloud APIs
A cloud provides APIs to retrieve information instances, images, users, networks, instance storage, apiendpoints, quotas, and hypervisors. This information must be collected as part of instance and cloud configuration during different phases of the benchmark.
The kit ships with a reference set of scripts that have been tested with OpenStack. It is the responsibility of a cloud provider to provide an implementation of these scripts to the extent possible, test them, ensure that they are executed during a compliant run, and include the source code of the scripts in the FDR report.
The reference implementation for OpenStack is present in the following directory:
cd ~/osgcloud/driver/support_script/cloud_config/openstack
These scripts are only executed if cloud_config_support_evidence flag is set to true. For testing, the execution of these scripts is not needed.
- getinstances.sh
List all instances running in the cloud. The following information must be included: instance name, instance id, instance type or details (flavor), image id from which instance is provisioned, network id to which instance is connected to, state of the instance, time at which instance was started, ssh key used, id of the user who launched the instance, tenant id to which a user belongs (if applicable)
For black box, add the region/data center name as well as any availability zone information for the instances.
- getinstancetypes.sh
List the types of various instances available for provisioning in the cloud.
- getimages.sh
List the image names and image ids from which instances can be provisioned.
- getapiendpoint.sh
List the API endpoints which are called by CBTOOL to provision instances and other cloud resources.
- getusers.sh
List the users configured for this cloud.
- gettenant.sh
List the tenants configured for this cloud. Blackbox clouds do not necessarily have to have a separate tenant list.
- getnetworks.sh
List the networks (virtual) and routers (virtual) configured for this cloud. The following information must be included: network id, network name, IP address range, router information
- getquotas.sh
List the quota for the user or tenant. Following information must be included. instance quota, storage quota
- getblockstorage.sh
List the block storage devices and the instances they are attached to.
- gethypervisors.sh
[WHITEBOX ONLY] list the hypervisors in the cloud that are used in the cloud.

Table Of Contents
- Benchmark Harness: CBTOOL and Benchmark Drivers Setup and Preparation
- Introduction to CBTOOL
- Preparing a QCOW2 Benchmark Harness Image for Ubuntu (CBTOOL and Benchmark Drivers)
- Preparing a QCOW2 Benchmark Harness Image for Centos (CBTOOL and Benchmark Drivers)
- Preparing an EC2 Benchmark Harness Image (CBTOOL and Benchmark Drivers)
- Preparing a Google Compute Engine Benchmark Harness Image (CBTOOL and Benchmark Drivers)
- Preparing a Digital Ocean Benchmark Harness Image (CBTOOL and Benchmark Drivers)
- Configuring CBTOOL For Your OpenStack Cloud
- Configuring CBTOOL For Amazon Elastic Compute Cloud
- Configuring CBTOOL For Google Compute Engine
- Configuring CBTOOL For Digital Ocean
- Multiple Network Interfaces on Benchmark Harness Machine
- Timezone and NTP server
- Adding a New Cloud Adapter (native method)
- Adding a New Cloud Adapter (simplified libcloud method)
- How Provisioning Scripts are Executed
- Cloud Configuration Gathering Scripts Through Cloud APIs
Previous topic
Before Setting up the Benchmark
Next topic
Running Benchmark with a Simulated Cloud