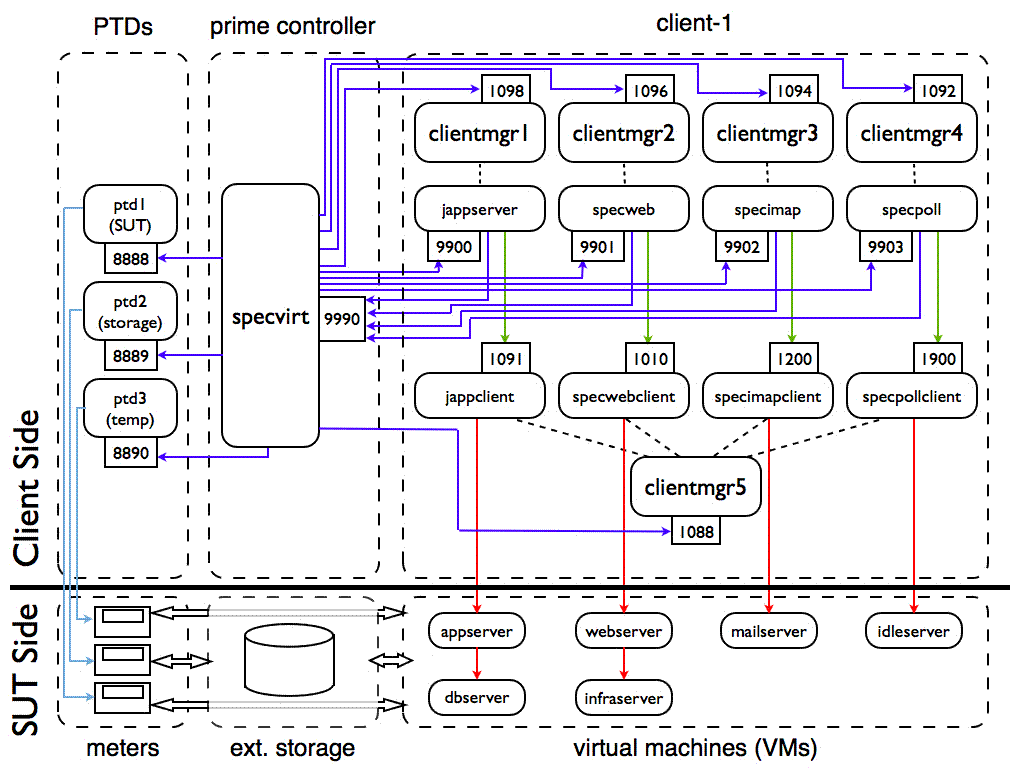
 |
| Single-tile, full testbed representation. |
These instructions also assume you have read the SPECvirt Design Document and are familiar with concepts and terminology introduced there that are used in these instructions.
 |
| Single-tile, full testbed representation. |
opt
  - SPECimap
  - SPECjAppServer2004
  - SPECpoll
  - SPECptd
  - SPECvirt
  - SPECweb2005
A SPECvirt benchmark run has two measurement phases: a "loaded" phase and an "unloaded" phase. During the loaded phase, SPECpoll is used to poll the idle server VM while the other threee workloads are creating request-generated load against their corresponding VMs. During the no-load, or "active idle" phase, SPECpoll is used to poll all VMs. (Please refer to the SPECpower Methodology for more information about "active idle" power measurement.)
There are two different sets of setup instructions: those for the VMs, and those for the clients.
If you want to run all workloads on all tiles at a higher or lower load level than the default, changing the value of the property LOAD_SCALE_FACTORS allows you to do this. (Of course, for higher load levels, you need to assure that the corresponding workload VM datasets are built to support the higher load levels.) Note that the comma-delimited string of numbers in the non-indexed LOAD_SCALE_FACTORS property determines the number of measurement intervals to run in a single test. Also note that the ",0" at the end of the LOAD_SCALE_FACTORS string only applies to power measurement runs. In the case of power-included runs, wherever a "0" value is included in the LOAD_SCALE_FACTORS string, during that interval the prime controller runs an active idle measurement. However, all "0" values are ignored for non-power tests. The only reason to remove the active idle-specific load reference in this string is if you wanted to skip an active idle measurement in a benchmark run that includes power measurement.
By default, tile index numbers must start at 0 and increase by one for each added tile. And because the datasets for each tile are tile number-specific, using this default methodology requires that you first set up and run Tile 0, and then set up and add Tile 1, etc. Further, by default each tile can only be run along with all of the lower numbered tiles. That is, you cannot run Tile 1 by itself because the default ordering scheme expects the first tile to be Tile 0.
This is where the TILE_ORDINAL property may come in handy. Using the TILE_ORDINAL property supercedes the default ordering scheme. However, if tile ordinals are used, then they must be specified for all tiles used in a benchmark run. For example, if you use TILE_ORDINAL for a four-tile run, the harness will expect TILE_ORDINAL[0] through TILE_ORDINAL[3] defined in Control.config. (It will ignore any values for indexes greater than 3.)
The simplest and perhaps most common case for using TILE_ORDINAL is when you have just set up your second tile and want to test only that tile in a benchmark run. In that case, you set "TILE_ORDINAL[0] = 1" and then make sure all other tile index references in Control.config for Tile 1 are consistent with that tile (e.g. assure the PRIME_HOST[1][w] values point to the hostnames and ports for Tile 1, etc). When the prime controller begins benchmark execution, it will then see that you want Tile 1 to be your first tile, and will execute accordingly.
With TILE_ORDINALs, the only expectation is that the TILE_ORDINAL
indexes start at 0 and increase by one for each additional tile. The
values used for the tile numbers and their ordering are not bound by
such constraints. For example, assuming you had four tiles set up and
wanted to run two of them at a time, in addition to running:
TILE_ORDINAL[0] = 2
TILE_ORDINAL[1] = 3
you could run:
TILE_ORDINAL[0] = 1
TILE_ORDINAL[1] = 3
or even:
TILE_ORDINAL[0] = 3
TILE_ORDINAL[1] = 0
Thus the TILE_ORDINAL property allows running any tile in any order
in a benchmark run, provided the corresponding tile indexes for the
other properties in Control.config are consistent. For example, in a
four-tile run using the TILE_ORDINAL property, LOAD_SCALE_FACTORS[3] no
longer also refers to the fourth tile in a run. It now refers
specifically to Tile 3. So if Tile 3 was not included as one of the
values in the TILE_ORDINAL list, it would skip this tile-specific load
scaling and would instead run all tiles at the default
LOAD_SCALE_FACTORS rate.
If this synchronization is performed via NTP, then you must assure that time synchronization does not occur in the middle of a benchmark run, as time shifts during a run can compromise response time measurements on the clients as well as compromise the jappserver workload's ability to accurately perform post-run database checks.
For example, for PRIME_HOST[0][0] = "myhostname:1098", from the SPECvirt directory on myhostname, start a client manager process as follows:
java -jar clientmgr.jar -p 1098 -log
Repeat this for each PRIME_HOST entry in Control.config. For a compliant benchmark, you will start four of these process for each tile (one each for jappserver, specweb, specimap, and specpoll).
ex. For WORKLOAD_CLIENTS[0] = "myhostname:1091" and CLIENT_LISTENER_PORT = "1088", from the SPECvirt directory on myhostname, I would start a client manager process as follows:
java -jar clientmgr.jar -p 1088 -log
Repeat this for each unique client host. Note that you do not use the port specified in WORKLOAD_CLIENTS -- that port is for the workload client to use to listen for RMI commands from its prime client. The CLIENT_LISTENER_PORT (1088) is used for communication between the SPECvirt prime controller and the client manager process.
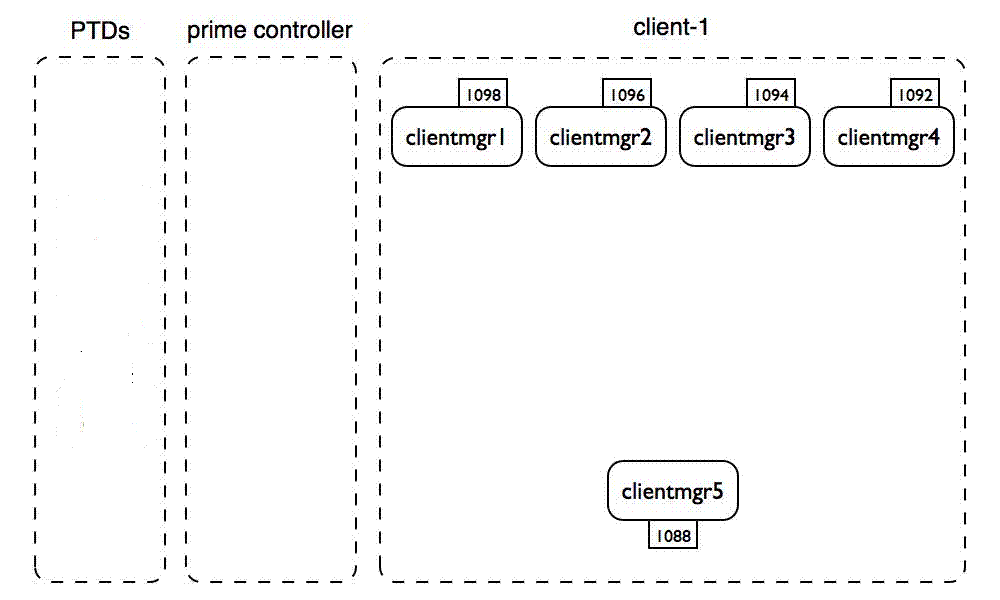 |
| Stage 1: The clientmgr processes are started. |
The following example also assumes the daemons are being started on a "unix-like" prime controller and communication betwen the prime controller and the daemons occurs via the controller's serial ports. However, these daemons need not be local to the controller, and there are Windows executable files available for daemons connected to Windows systems.
Within the installation directory containing the SPECvirt and workload directories (/opt by default for a Unix/Linux environment) is a "SPECptd" directory that contains the ptd executable and script/batch files for starting the power and temperature daemons. The format for starting the (Linux) ptd is:
./ptd-linux-x86 [options] <device-type-#> <device-port>
From the /opt/SPECptd directory, running "./ptd-linux-x86" displays the invocation options for this executable. For communicating with a supported power meter, you can find the number that corresponds to your meter in this output. ("0" starts the ptd in dummy mode.) Of the paramter options listed in the output, the "-t" option (runs the ptd in temperature mode) and the "-p port" option are the most commonly used. Since the ptd by default tries to use port 8888, you must use the "-p port" option to override this value if that port is already in use by another ptd or other process.
As an example:
./ptd-linux-x86 -p 8890 8 /dev/ttyS0
starts a ptd daemon in power mode using port 8890 and communicates with a Yokogawa WT210 power meter connected to /dev/ttyS0 (COM1) of a (Linux-based) prime controller. Alternatively:
./ptd-linux-x86 -t -p8890 1000 /dev/ttyS0
runs the ptd in "temperature mode" with the ptd returning "dummy" temperature data.
Once the PTD executables are able to communicate with the power meters correctly when started, the next step is to tell the prime controller about these PTD settings in Control.config. The first parameter to change is to set USE_PTDS to "1". Once so set, the controller uses all PTDs defined via a PTD_HOSTS[x] entry. PTD_HOST is the hostname of the system running the PTD. For this example, since the three PTDs are running on the prime controller, we can simply set:
PTD_HOST[0] = localhost
PTD_HOST[1] = localhost
PTD_HOST[2] = localhost
Next tell the prime controller what port each of the PTDs are listening on. This must match the ports specified when invoking the PTD:
PTD_PORT[0] = 8888
PTD_PORT[1] = 8889
PTD_PORT[2] = 8890
Lastly tell the prime controller what the specified PTD is measuring: server power (SUT), external storage power(EXT_STOR), or in the case of ambient temperature measurement, which component the temperature sensor is near:
PTD_TARGET[0] = "SUT"
PTD_TARGET[1] = "EXT_STOR"
PTD_TARGET[2] = "SUT"
For the temperature daemon the PTD_TARGET is either SUT or EXT_STOR, depending on where ambient temperature is being measured. SAMPLE_RATE_OVERRIDE and OVERRIDE_RATE_MS should generally not be modified. LOCAL_HOSTNAME and LOCAL_PORT specify the local network interface and port to use to connect with the PTD_HOST. (In most cases, specifying these two properties is unnecessary, and they can be left commented out.) The following picture shows the addition of three power/temperature daemons, listening for commands on their respective RMI ports.
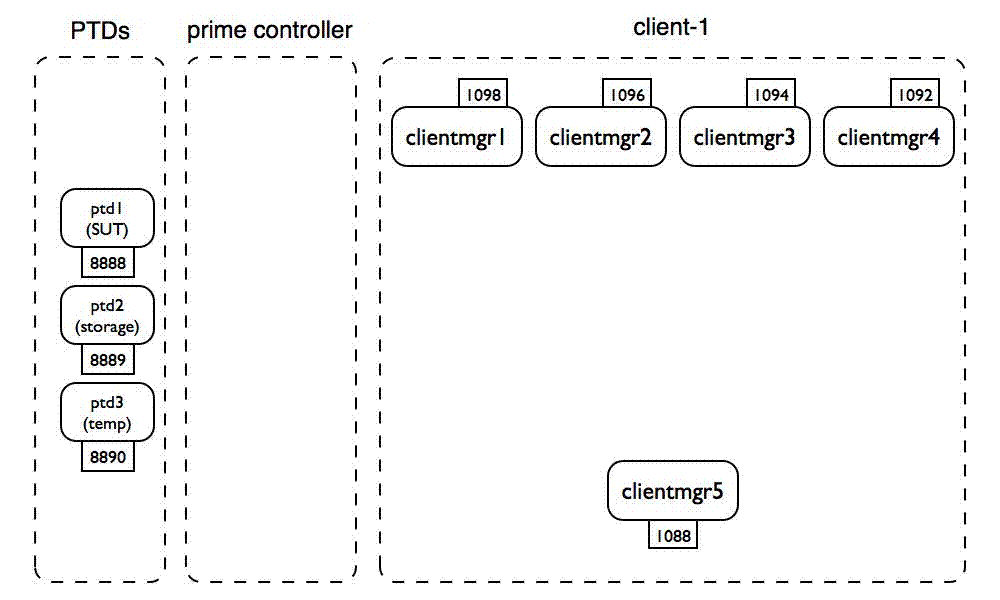 |
| Stage 2: The power and temperature daemons are started. |
The last step in configuring the PTDs is to link a specific PTD with a specific power meter description. This is done through the PWR.PTD_INDEX[] and TMP.PTD_INDEX[] properties in Testbed.config. For each power or temperature meter listed in Testbed.config there must be a PTD_INDEX value that corresponds to one of the PTD_HOST indexes in Control.config.
java -jar specvirt.jar -l
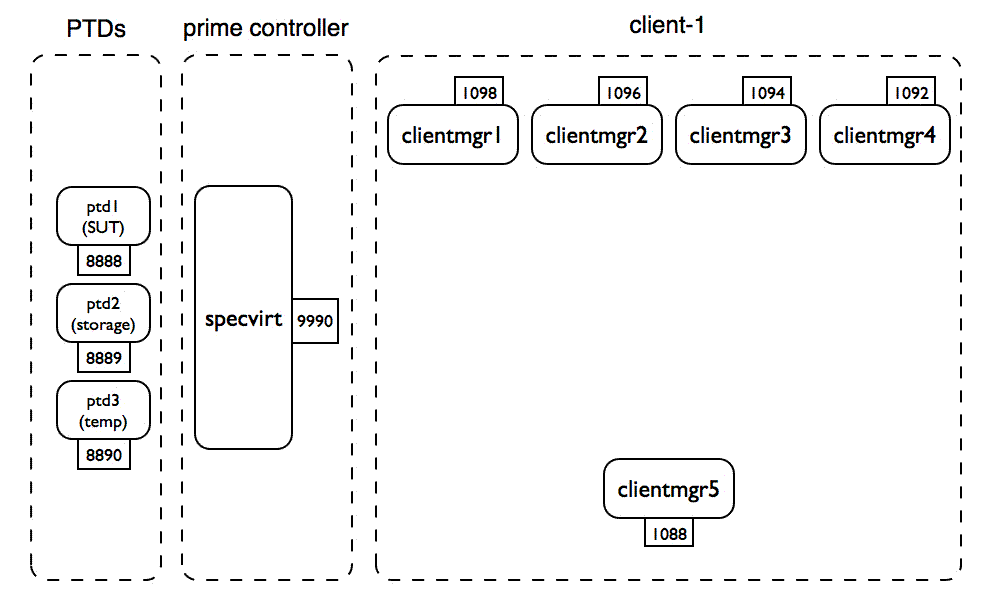 |
| Stage 3: The specvirt prime controller is started. |
The SPECvirt prime controller (specvirt) next tells the client managers that host the workload clients to start the workload clients:
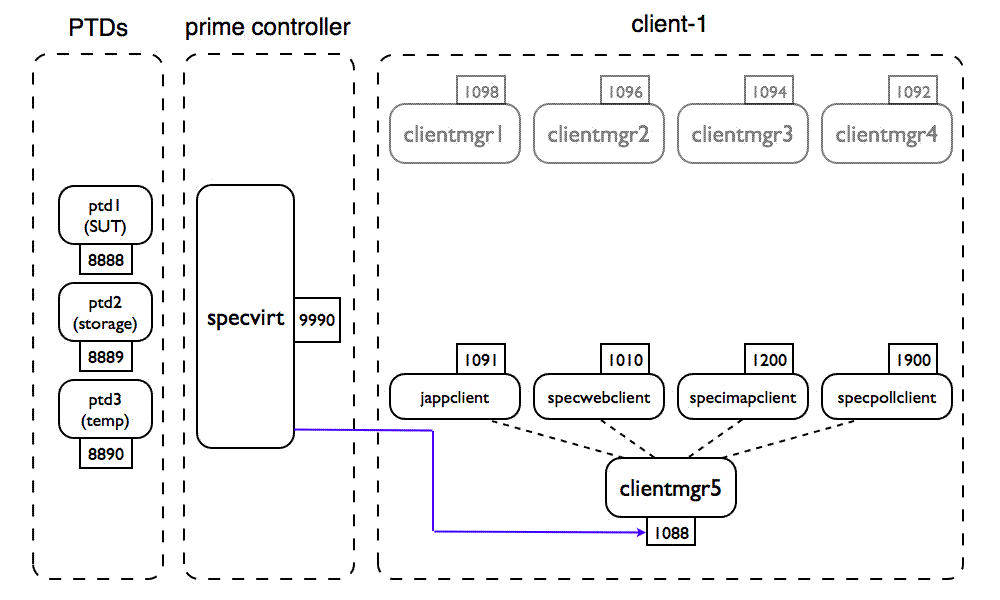 |
| Stage 4: The specvirt prime controller starts workload clients. |
The prime controller then waits PRIME_START_DELAY seconds and then tells the client managers hosting the workload prime clients to start their prime clients.
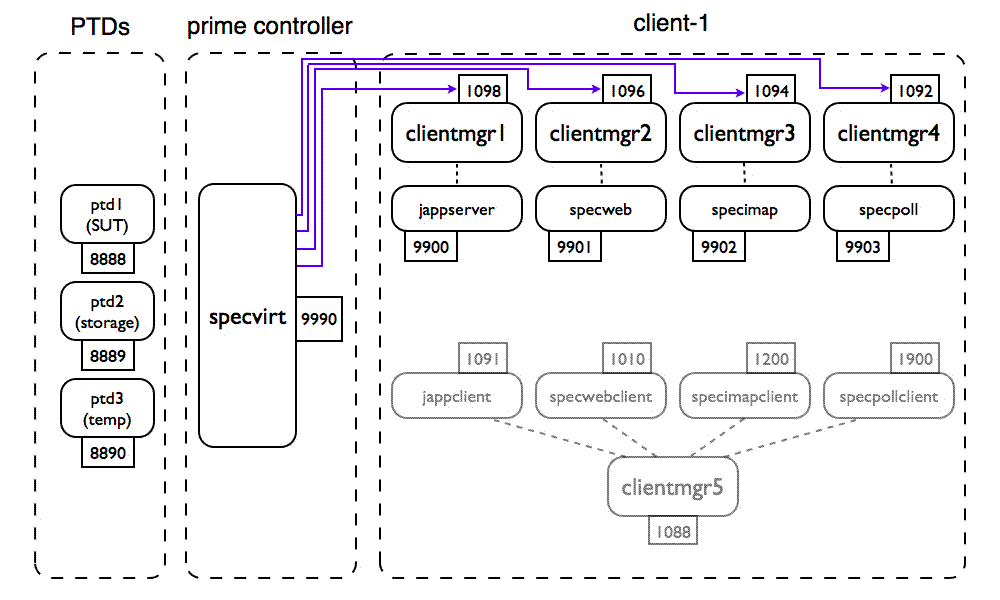 |
| Stage 5: The specvirt prime controller starts workload prime clients. |
With all of the PTD, workload client, and prime client processes running, the benchmark has started and the remainder of the benchmark run involves communication between these processes and the SPECvirt prime controller (specvirt) as illustrated in the following figure.
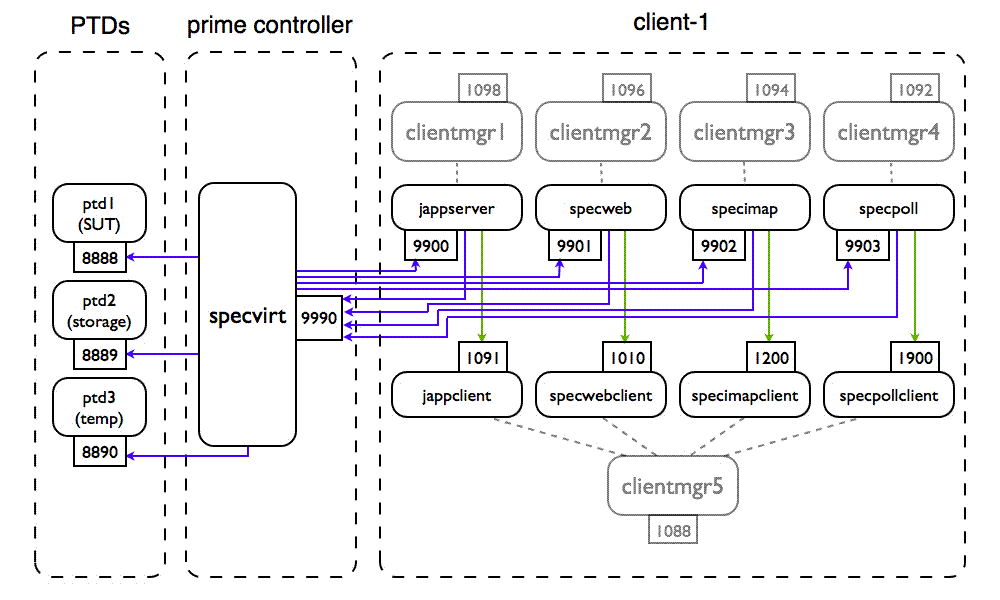 |
| Stage 6: Client-side benchmark runtime communication |
If you have multiple values in LOAD_SCALE_FACTORS, it iterates through that number of load points as independent workload runs of a single SPECvirt benchmark run. That is, results from all iterations are reported in a single SPECvirt benchmark raw file. At the end of each iteration, after all prime clients have reported that their runs have ended, the prime controller cleans everything up and terminates the run. If the client and prime client processes have exited correctly, you should see three extra line-feeds after the "Done killing procs ..." message on each client manager console. These extra lines are added as demarcation points between run intervals, but also provide a quick way of determining whether the client manager process cleaned up everything correctly. If you don't see these line feeds, stop and restart the client manager process before attempting another benchmark run.
Between load point intervals, the prime controller waits QUIESCE_SECONDS and then starts the next load interval. Polling data as well as the performance/QOS-related data from each run interval is included in the specvirt raw file (specvirt-*.raw) in the SPECvirt results subdirectory.
Once the benchmark has ended, to start another run on the SPECvirt prime controller, invoke:
java -jar specvirt.jar -l
The client manager processes on the benchmark clients remain running, as do any ptd processes, so you only need to restart the SPECvirt prime controller. Note that while the number of clientmgr processes increases with increasing numbers of tiles (i.e. increasing load), there is always just one prime controller and one set of power/temperature daemons, regardless of the number of tiles.
|
|
If the report requires editing, modify the properties in the raw file rather than in Control.config or Testbed.config. Within the raw file, however, RESULT_TYPE is the only editable property from Control.config. Other than this, only the properties contained in Testbed.config may be edited in a raw file.
Once edited, to regenerate the formatted results using the edited raw file, invoke the reporter by passing it the name of the raw file as a parameter. Ex:
java -jar reporter.jar -r <raw_file_name>
For a complete list of reporter invocation options, pass the reporter the "-h" argument.
java -jar reporter.jar -r <raw_file_name> [-t [1-7]]
If you wish to change the type of formatted result files generated without changing the RESULT_TYPE property in the raw file, override the value in the raw file by passing the “-t” parameter with the corresponding result type to the reporter. Otherwise, you can omit this parameter from the invocation string.
If you have a submission file and want to recreate the raw file from which it was generated, you can invoke:
java -jar reporter.jar -s <sub_file_name>
and it will strip out the extra characters from the submission file so that you can view or work with the original raw file. This is the recommended method for editing a file post-submission because it assures you are not working with an outdated version of the corresponding raw file and potentially introducing previously corrected errors into the "corrected" submission file.
| CONFIGURABLE BENCHMARK PROPERTIES | |||||||||||||||||||||||||||||||||||||||
|---|---|---|---|---|---|---|---|---|---|---|---|---|---|---|---|---|---|---|---|---|---|---|---|---|---|---|---|---|---|---|---|---|---|---|---|---|---|---|---|
| KEY | DESCRIPTION | ||||||||||||||||||||||||||||||||||||||
| NUM_TILES | NUM_TILES is the primary property used to increase or decrease the load on the SUT. | ||||||||||||||||||||||||||||||||||||||
| SPECVIRT_HOST SPECVIRT_RMI_PORT |
These are the hostname and port on which the SPECvirt prime controller listens for RMI commands. Because the prime clients use this information to contact the prime controller, the hostname used must resolve to the same IP address on both the SPECvirt prime controller and each of the prime clients. | ||||||||||||||||||||||||||||||||||||||
| RMI_TIMEOUT | This is the number of seconds SPECvirt waits for the prime clients to start their RMI servers before aborting the benchmark run. If your benchmark run is failing because the prime clients need more time for their initial setup, you can increase this value. However, it is unlikely that this value will be too small, so if you get a timeout, first look at the log files or console output on the prime clients and see if something else caused the clients to fail to start correctly. | ||||||||||||||||||||||||||||||||||||||
| TILE_ORDINAL[x] | Use TILE_ORDINAL to control which sets of PRIME_HOST clients to use for the run. The value specified corresponds to the "tile" number index specified in the PRIME_HOSTS key (i.e. PRIME_HOSTS[tile][workload]. If commented out, then the benchmark starts with PRIME_HOST[0][workload] and increments the PRIME_HOST tile index until it reaches NUM_TILES. If used, you must specify the TILE_ORDINAL index and value for *all* tiles (starting with 0). | ||||||||||||||||||||||||||||||||||||||
| PRIME_HOST[t][w] | This specifies the hostname and port number for each prime client (or workload controller). The indexes used specify the tile and workload index, respectively, and therefore must be unique. If there are multiple prime clients on a single host, then each must listen on a different port number. There is one PRIME_HOST per workload and "NUM_WORKLOADS" PRIME_HOSTs per TILE. The format is PRIME_HOST[tile][workload] = "<host>:<port>". Values for keys with indexes greater than NUM_TILES - 1 and NUM_WORKLOADS - 1, respectively, are ignored. | ||||||||||||||||||||||||||||||||||||||
| SPECVIRT_INIT_SCRIPT SPECVIRT_EXIT_SCRIPT |
The values for SPECVIRT_INIT_SCRIPT and SPECVIRT_EXIT_SCRIPT are the full name and path of any single script you wish to run on the prime controller before or after a benchmark run, respectively. Specifying only the script without the full path is acceptable if the script exists in the current path of the SPECvirt controller. | ||||||||||||||||||||||||||||||||||||||
| PRIME_HOST_INIT_SCRIPT[w] (or PRIME_HOST_INIT_SCRIPT[t][w]) PRIME_HOST_EXIT_SCRIPT[w] (or PRIME_HOST_EXIT_SCRIPT[t][w]) |
PRIME_HOST_INIT_SCRIPT and PRIME_HOST_EXIT_SCRIPT are used to run scripts on the prime client systems before or after a benchmark run, respectively. If you include a path with the script name, it must be the full path. Specifying a file name only assumes the file exists in the current working directory of the prime client (typically the location of clientmgr.jar). If you need to run tile-specific initialization or exit scripts, use the double-indexed form of this property. | ||||||||||||||||||||||||||||||||||||||
| PRIME_HOST_RMI_PORT[w] (or PRIME_HOST_RMI_PORT[t][w]) |
The PRIME_HOST_RMI_PORT is the port on which each prime client is listening for commands from the SPECvirt prime controller. Note that if you have more than one prime client on the same system, you MUST use different port numbers for each. Also, if you run more than one of the same type of workload on the same client, then you must use the double-index ([t][w]) form of this key so that you can set unique port numbers for the identical workloads on different tiles. | ||||||||||||||||||||||||||||||||||||||
| PRIME_PATH[w] (or PRIME_PATH[t][w]) |
PRIME_PATH is the full path to the prime client. SPECvirt uses this path in order to start the workload's prime client. If you are running multiple prime clients of the same workload type (for different tiles), then you will likely want to use the double-index ([t][w]) form of this key so that you can specify different workload paths for each of the workloads. If running only one tile per client or less, the single-index form is sufficient. | ||||||||||||||||||||||||||||||||||||||
| POLL_PRIME_PATH | POLL_PRIME_PATH is the path to specpoll.jar that the harness uses during the active idle polling interval. Note that this is used only for the active idle polling interval, and because the harness does not use the IDLE_SERVER value during this interval, you do not need a unique Test.config file for each instance, negating the need for unique path for each instance. | ||||||||||||||||||||||||||||||||||||||
| CLIENT_PATH[w] (or CLIENT_PATH[t][w]) |
CLIENT_PATH is the full path to the client for a given workload. SPECvirt uses this path in order to start the workload's client. If you are running multiple clients of the same workload type (for different tiles), then you will likely want to use the double-index ([t][w]) form of this key so that you can specify different paths for each of the workloads. If running only one tile per client (or less), the single-index form is sufficient. | ||||||||||||||||||||||||||||||||||||||
| POLL_CLIENT_PATH | POLL_CLIENT_PATH is the path to specpollclient.jar that the harness uses during the active idle polling interval. Note that this is used only for the active idle polling interval and not for the idle server polling. | ||||||||||||||||||||||||||||||||||||||
| FILE_SEPARATOR | Use FILE_SEPARATOR if you want to override the use of the prime client OS's file separator. (This may be required when using a product like Cygwin on Windows.) | ||||||||||||||||||||||||||||||||||||||
| PRIME_APP[w] (or PRIME_APP[t][w]) |
PRIME_APP is the workload prime client process that the client manager process starts for each benchmark workload, with indexes corresponding to the different workloads being run. The double-index form of this key should only be required if there are tile-specific differences between the values used. | ||||||||||||||||||||||||||||||||||||||
| POLL_PRIME_APP | POLL_PRIME_APP is the invocation string for the idle polling application that the harness uses during the active idle polling interval. Note that this key is not used for idle server polling during a loaded run. | ||||||||||||||||||||||||||||||||||||||
| CLIENT_APP[w] (or CLIENT_APP[t][w]) |
CLIENT_APP is the name of the client (workload driver) that the clientmgr process starts and that the workload prime client controls. Any arguments that you pass to the client application must follow the name. The double-index form of this key is only required if there are tile-specific differences between the values used. | ||||||||||||||||||||||||||||||||||||||
| POLL_CLIENT_APP | POLL_CLIENT_APP is the invocation string for the idle polling client application that is used during the idle polling interval. Note that this key is not used for idle server polling during a loaded run. | ||||||||||||||||||||||||||||||||||||||
| PRIME_START_DELAY | PRIME_START_DELAY is the number of seconds to wait after starting the clients before starting the prime clients. Increase this value if you find that prime clients fail to start because the clients have not finished preparing to listen for prime client commands before these commands are sent. | ||||||||||||||||||||||||||||||||||||||
| WORKLOAD_START_DELAY[w] (or WORKLOAD_START_DELAY[t][w]) |
WORKLOAD_START_DELAY staggers the time at which clients begin to ramp up their client load by delaying client thread ramp-up by the specified number of seconds. Seconds specified is total time from the beginning of the client ramp-up phase. Therefore, if you have delays of 1, 5, and 3, repectively for three different clients, the order of the start of workload client ramp-up is first, third, and then second. | ||||||||||||||||||||||||||||||||||||||
| RAMP_SECONDS[w] (or RAMP_SECONDS[t][w]) WARMUP_SECONDS[w] (or WARMUP_SECONDS[t][w]) |
RAMP_SECONDS and WARMUP_SECONDS supercede any values used in the workload-specific configuration files for ramp-up and warm-up time. (For example, RAMP_SECONDS overrides "triggerTime" in SPECjAppServer2004.) These values need not be identical between workloads or even between tiles, as the SPECvirt harness extends the runtime of any workloads, as needed, to assure the required common polling interval. However, the minimum compliant RAMP_SECONDS value is 180 and the minimum WARMUP_SECONDS value is 300 for all tiles and all workloads. | ||||||||||||||||||||||||||||||||||||||
| POLL_INTERVAL_SEC | POLL_INTERVAL_SEC is the number of seconds that data is collected once polling starts. This represents the "common" benchmark runtime interval when all workloads are in their runtime measurement phase. The minimum compliant value is 7200. | ||||||||||||||||||||||||||||||||||||||
| ECHO_POLL | ECHO_POLL controls whether client polling values are mirrored on the prime clients. If set to 0, this polling data is only displayed on the SPECvirt prime controller terminal. | ||||||||||||||||||||||||||||||||||||||
| DEBUG_LEVEL | DEBUG_LEVEL controls the amount of debug information displayed during a benchmark run by the prime controller. | ||||||||||||||||||||||||||||||||||||||
| WORKLOAD_CLIENTS[w] (or WORKLOAD_CLIENTS[t][w]) |
The WORKLOAD_CLIENTS values are the client hostnames (or IP addresses) and ports used by the workload clients. The hostname or IP address is specified relative to the workload prime client, and not the SPECvirt controller. For example, specifying 127.0.0.1 (or "localhost") tells the workload prime client to run this client on its host OS's loopback interface, rather than locally on the SPECvirt controller. If, for example, you use the hostname "client1" for all of your clients, and the corresponding prime client resolves this name to a unique IP address on each prime client used, then these keys can be of the form WORKLOAD_CLIENTS[w]. Otherwise, like the PRIME_HOST keys, these need to be of the form WORKLOAD_CLIENTS[t][w]. | ||||||||||||||||||||||||||||||||||||||
| CLIENT_LISTENER_PORT | CLIENT_LISTENER_PORT is the port used by the clientmgr listener on each physical client system (driver) to start the client processes for each workload on that physical client. | ||||||||||||||||||||||||||||||||||||||
| POLLING_RMI_PORT | POLLING_RMI_PORT is the port used to communicate with the pollme processes running on the benchmark VMs. Pass this value to the pollme listeners when starting them on all VMs. | ||||||||||||||||||||||||||||||||||||||
| PRIME_CONFIG_FILE[w] (or PRIME_CONFIG_FILE[t][w]) |
PRIME_CONFIG_FILE is the list of any files to copy from the corresponding LOCAL_CONFIG_DIR directory on the SPECvirt prime controller to the PRIME_CONFIG_DIR directory on the corresponding PRIME_HOST. Leave these as empty strings if you do not want to overwrite the workload configuration files on each prime client. | ||||||||||||||||||||||||||||||||||||||
| LOCAL_CONFIG_DIR[w] (or LOCAL_CONFIG_DIR[t][w]) PRIME_CONFIG_DIR[w] (or PRIME_CONFIG_DIR[t][w]) |
LOCAL_CONFIG_DIR is the source location on the SPECvirt prime controller for the configuration files to copy to the workload prime clients. PRIME_CONFIG_DIR is the target location on the workload prime client for the config files copied from the source location. | ||||||||||||||||||||||||||||||||||||||
| POLL_CONFIG_FILE POLL_LOCAL_CFG_DIR POLL_PRIME_CFG_DIR |
These are the keys corresponding to PRIME_CONFIG_FILE, LOCAL_CONFIG_DIR, and PRIME_CONFIG_DIR, respectively, for the active idle polling interval. | ||||||||||||||||||||||||||||||||||||||
| USE_RESULT_SUBDIRS | Setting USE_RESULT_SUBDIRS to 1 puts each set of result files in a different results subdirectory with a unique timestamp-based name. Setting to 0 avoids creating a unique subdirectory, and any earlier results in the parent "results" directory are overwritten by newer test results. Setting USE_RESULT_SUBDIRS to 0 is only recommended for use with Faban. (Conversely, setting USE_RESULT_SUBDIRS to 1 is not recommended when using Faban.) | ||||||||||||||||||||||||||||||||||||||
| USE_PTDS | USE_PTDS controls whether the power/temp daemons (PTDs) are used during the benchmark. Set to 0 to run without taking power or temperature measurements. | ||||||||||||||||||||||||||||||||||||||
| PTD_HOST[x] | PTD_HOST is the hostname of the system running the PTD. For more than one PTD, copy, paste, and increment the index (x) for each PTD. | ||||||||||||||||||||||||||||||||||||||
| PTD_PORT[x] | PTD_PORT is the corresponding port the PTD is listening on. | ||||||||||||||||||||||||||||||||||||||
| PTD_TARGET[x] | PTD_TARGET is the type of component the power/temp meter is monitoring. ("SUT" identifies meter as monitoring a main system/server; "EXT_STOR" identifies meter as monitoring any external storage used.) | ||||||||||||||||||||||||||||||||||||||
| SAMPLE_RATE_OVERRIDE[x] OVERRIDE_RATE_MS[x] |
Setting SAMPLE_RATE_OVERRIDE for any PTD allows you to override the default sample rate for the power or temperature meter. This is not recommended in most cases. However, if overridden, OVERRIDE_RATE_MS is the sample rate (in milliseconds) used instead of the meter's default, . | ||||||||||||||||||||||||||||||||||||||
| LOCAL_HOSTNAME[x] LOCAL_PORT[x] |
LOCAL_HOSTNAME and LOCAL_PORT are used to specify the local network interface and port to use to connect with the PTD_HOST. In most cases, you do not need to specify these values. Leave them commented out unless needed. | ||||||||||||||||||||||||||||||||||||||
| LOAD_SCALE_FACTORS[t] | This is the tile-specific format of the fixed property LOAD_SCALE_FACTORS. Tile "t" runs at the specified load scaling factor. Compliant values are between 0.1 and 0.9 in increments of 0.1. This property allows for one tile to run at reduced load. Defining more than one tile to run at a reduced load, or for any tile to run at greater-than-full'load (i.e. LOAD_SCALE_FACTORS value > 1.0) results in a non-compliant run. | ||||||||||||||||||||||||||||||||||||||
| RESULT_TYPE | Use RESULT_TYPE to control the type of result submissions
and/or formatted reports you would like to create. The following table
lists the possible values and which combinations of reports are
generated for each value:
|
||||||||||||||||||||||||||||||||||||||
| IGNORE_CLOCK_SKEW CLOCK_SKEW_ALLOWED |
Setting IGNORE_CLOCK_SKEW to "1" causes the prime controller to skip the system clock synchronization check at the beginning of a benchmark run. Setting to "0" (default) means the prime controller and the prime clients perform this check to assure all prime clients, clients, and VMs are in time sync with the prime controller. If set to "0", CLOCK_SKEW_ALLOWED is the number of seconds of clock skew the prime controller and prime clients will allow at the beginning of a benchmark run without aborting. | ||||||||||||||||||||||||||||||||||||||
| FIXED
BENCHMARK
PROPERTIES (changing these values results in a non-compliant test) |
|
|---|---|
| KEY | DESCRIPTION |
| NUM_WORKLOADS VMS_PER_TILE |
NUM_WORKLOADS defines the number of workloads per tile used to drive the SUT. VMS_PER_TILE is the number of VMs that are used in each tile. For a compliant run, NUM_WORKLOADS must be 4 and VMS_PER_TILE must be 6. |
| WORKLOAD_LABEL[w] | These values serve as descriptive labels of each of the workloads used in the benchmark. Assuming NUM_WORKLOADS = 4, there should be four corresponding values for each of the workloads. |
| IDLE_RAMP_SEC IDLE_WARMUP_SEC IDLE_POLL_SEC |
IDLE_RAMP_SEC, IDLE_WARMUP_SEC, and IDLE_POLL_SEC are the ramp, warmup, and polling/runtime values used for the active-idle measurement phase only. |
| POLL_MASTERS | POLL_MASTERS controls whether or not to request polling data from the prime clients. If set to 0, the harness does not conduct prime client polling during the polling interval. |
| INTERVAL_POLL_VALUES | Set this to 0 for cumulative polling data over the entire measurement interval. Set it to 1 if you want only the polling data that is added between polling intervals. Note: some workloads do not support polling-interval-based results reporting and ignore a non-zero value. Therefore, the only value that assures consistency across workloads is 0. |
| POLL_DELAY_SEC | POLL_DELAY_SEC is the number of seconds after all prime clients have started running that the prime controller waits before starting to request polling data. |
| BEAT_INTERVAL | BEAT_INTERVAL is the number of seconds between prime client pollings. This controls the frequency that the harness polls the prime clients for runtime data (if POLL_MASTERS is set to 1). |
| RESULT_FILE_NAMES[w] POLL_RES_FILE_NAMES |
RESULT_FILE_NAMES are the names of the results files created by the workload that the prime controller collects from the prime clients after a run has completed. The indexes correspond with the workload indexes. POLL_RES_FILE_NAMES is the corresponding equivalent result file collected during an active-idle run. |
| USE_WEIGHTED_QOS | USE_WEIGHTED_QOS controls the manner of calculating QOS for the workloads. A value of 0 means to apply the same weight to all QOS-related fields used to calculate the aggregate QOS value. A value of 1 (or higher) results in a weighted QOS based on frequency being used to calculate aggregate QOS. |
| PTD_POLL | Set PTD_POLL to 1 in order to poll the PTDs during the POLL_INTERVAL; set to 0 to avoid PTD polling. |
| POWER_POLL_VAL | POWER_POLL_VAL selects which value to poll from any power meter used during the test (possible values: "Watts", "Volts", "Amps", "PF"). |
| TEMP_POLL_VAL | TEMP_POLL_VAL controls which value to poll from any temperature meter used during the test (options: "Temperature", "Humidity"). |
| LOAD_SCALE_FACTORS QUIESCE_SECONDS |
LOAD_SCALE_FACTORS is the list of multipliers to the load levels for the individual workload levels. For each value and in the order listed, the benchmark harness runs a full run at the calculated load rate with a QUIESCE_SECONDS wait interval between each point. The number of values in this list control the number of iterations the benchmark will execute. |
| WORKLOAD_SCORE_TMAX_VALUE[w] | WORKLOAD_SCORE_TMAX_VALUE is the theoretical maximum throughput rate for each workload. Comment these values out if you do not want to normalize scores to the theoretical max. Setting the value to 0 has the effect of not using this workload's score in calculating the result. |
| WORKLOAD_LOAD_LEVEL[w] | WORKLOAD_LOAD_LEVEL supercedes any values used in the workload-specific configuration files to control client load. For the jApp workload, txRate is overwritten with this value. For web, SIMULTANEOUS_SESSIONS is overwritten. For imap, the number of users is set to this value. |